Crystal Growing Kit Instructions: A Comprehensive Guide
Embark on a fascinating journey into the world of crystal formation! DIY projects and products now allow anyone to cultivate these mesmerizing structures, unlocking scientific wonder.
Understanding Crystal Growth Basics
Crystal growth is a captivating scientific process rooted in the principles of chemistry and physics. It begins with a solution saturated with a specific chemical compound – think of dissolving table salt in water until no more will dissolve. As the solution cools or evaporates, the compound molecules begin to organize themselves into a highly ordered, repeating pattern.
This organized structure is what we recognize as a crystal. The rate of crystal growth is influenced by several factors, including temperature, concentration of the solution, and the presence of impurities. Patience is crucial, as forming visible crystals takes time. Understanding these basics empowers you to successfully cultivate your own stunning crystalline creations, transforming simple solutions into beautiful displays of natural artistry.
What is a Crystal Growing Kit?
A crystal growing kit is a self-contained package designed to facilitate the fascinating process of crystal formation at home. These kits typically include all the necessary components – a chemical compound (like alum, borax, or Epsom salts), a container, a stirring rod, and sometimes even a seed crystal to jumpstart the process.
They offer a hands-on learning experience, allowing individuals of all ages to explore the principles of chemistry and observe the wonders of crystallization firsthand. Kits remove the complexity of sourcing individual chemicals and provide clear, step-by-step instructions, making crystal growing accessible and enjoyable. It’s a fantastic way to spark curiosity and nurture a love for science!
Types of Crystals You Can Grow
Crystal growing kits commonly feature several readily available compounds, each yielding unique crystal formations. Alum crystals, known for their octahedral shape and clarity, are a popular choice for beginners. Borax crystals often produce needle-like or prismatic structures, exhibiting a beautiful, translucent appearance.
Epsom salt crystals, another frequent inclusion, tend to form blocky or tabular crystals, offering a different aesthetic. The specific type of crystal grown depends entirely on the chemical compound provided within the kit. Exploring these variations allows for a diverse collection and a deeper understanding of how different substances crystallize under similar conditions.
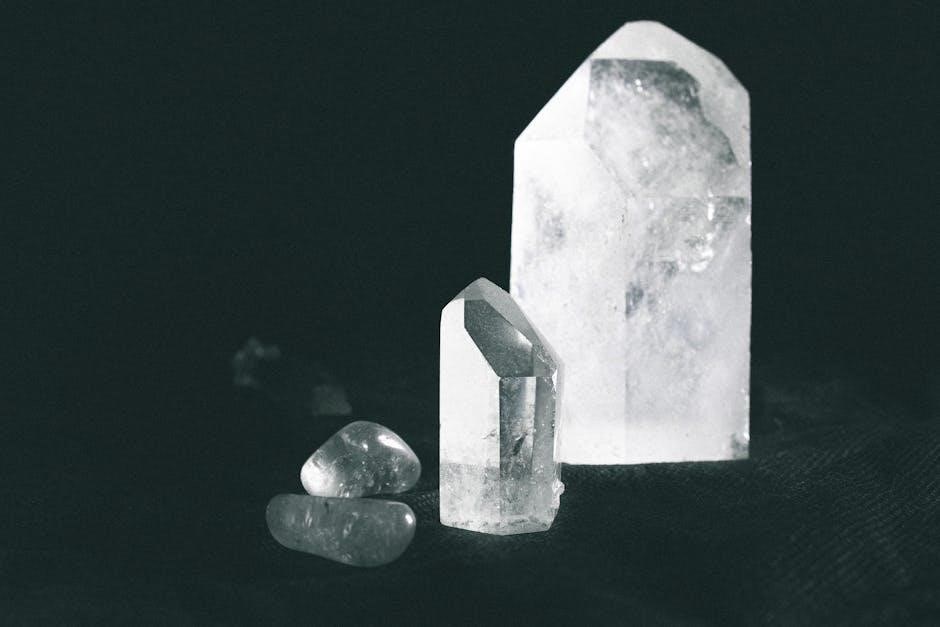
Alum Crystals (Potassium Aluminum Sulfate)
Alum crystals are a fantastic starting point for aspiring crystal growers due to their relatively simple growth process and impressive results. Potassium aluminum sulfate readily dissolves in hot water, creating a saturated solution ideal for crystallization. These crystals typically exhibit an octahedral shape – resembling a double pyramid – and boast a clear, glass-like appearance when properly grown.
Their clarity makes them excellent for observing internal structures and imperfections. Alum is non-toxic, adding an extra layer of safety for educational projects. Achieving large, well-defined alum crystals requires patience and careful control of temperature and solution saturation, making it a rewarding experience for all ages.
Borax Crystals (Sodium Borate)
Borax crystals offer a unique aesthetic, often appearing as feathery, needle-like formations rather than the classic geometric shapes. Sodium borate, like alum, dissolves readily in hot water, forming a supersaturated solution conducive to crystal growth. However, borax tends to create clusters of crystals, resulting in a more textured and organic appearance;
These crystals are popular for creating decorative items and science fair projects due to their distinctive look and relatively quick growth rate. While generally considered safe, it’s important to handle borax with care and avoid ingestion. Experimenting with different cooling rates and solution concentrations can influence the size and shape of the borax crystal formations.
Epsom Salt Crystals (Magnesium Sulfate)
Epsom salt crystals are renowned for their ease of growth, making them an excellent choice for beginners venturing into the world of crystallization. Magnesium sulfate readily dissolves in warm water, creating a clear solution that facilitates the formation of relatively large, well-defined crystals. These crystals typically exhibit a prismatic or needle-like shape, often with a translucent appearance.
Beyond their aesthetic appeal, Epsom salt crystals are non-toxic and commonly used in bath salts, adding a practical dimension to the experiment. Controlling the cooling process and minimizing disturbances are crucial for achieving optimal crystal size and clarity. Experimentation with coloring agents can also yield vibrant and visually striking results.
Kit Contents & Safety Precautions
Before beginning your crystal adventure, carefully review all included components and prioritize safety measures to ensure a successful and secure growing experience.
Typical Kit Components
Most crystal growing kits are thoughtfully assembled to provide everything needed for a successful experiment. You can generally expect to find a chemical compound – often alum, borax, or Epsom salts – which forms the basis of your crystals. A container, usually plastic or glass, is included to hold the supersaturated solution during the growth process.
Seed crystals, or a surface for initial crystal formation, are frequently provided, though you can also create your own. Stirring rods or spoons are essential for dissolving the chemical in water. Many kits also include a magnifying glass for closer observation of the developing crystals, and sometimes even dyes to add color.
Detailed instructions are a crucial component, guiding you through each step of the process. Finally, some kits may offer display stands or materials for showcasing your finished crystalline creations, enhancing the overall experience and allowing you to proudly exhibit your scientific achievement.
Safety First: Important Considerations
Prioritizing safety is paramount when undertaking any scientific experiment, especially those involving chemicals. Always read and understand all instructions thoroughly before beginning your crystal growing project. While the chemicals used are generally non-toxic, they can cause irritation if they come into contact with eyes or are ingested.
Protective eyewear, such as safety goggles, is highly recommended to prevent accidental splashes. Avoid touching the chemicals directly with your skin; if contact occurs, wash the affected area immediately with plenty of water. Work in a well-ventilated area to minimize inhalation of any potential fumes.
Proper disposal of the solution after the experiment is complete is also crucial – follow the instructions provided with your kit or consult local guidelines for chemical waste disposal. Remember, responsible experimentation ensures a safe and enjoyable learning experience for everyone involved.
Handling Chemicals Safely
Careful chemical handling is essential for a successful and safe crystal growing experience. Always treat the provided substances with respect, understanding they require cautious interaction. Avoid direct contact with skin and eyes; should accidental contact occur, immediately flush the affected area with copious amounts of water for at least fifteen minutes.
Never ingest any of the chemicals, even in small amounts. Keep the materials out of reach of young children and pets. When mixing solutions, add the chemical slowly to the water, stirring gently to avoid splashing. Utilize appropriate measuring tools to ensure accurate proportions, as deviations can impact crystal formation and safety.
Always wash your hands thoroughly with soap and water after handling the chemicals and completing the experiment. Proper handling minimizes risks and maximizes the enjoyment of your crystal growing adventure.
Adult Supervision Required
Crystal growing kits, while educational and fun, necessitate consistent adult supervision, particularly when children are involved. The kits contain chemicals that, while generally safe when handled correctly, require responsible oversight to prevent accidents or misuse. An adult should oversee the entire process, from solution preparation to crystal harvesting.
Adults should handle the measuring and mixing of chemicals, ensuring accurate proportions and minimizing the risk of spills or splashes. They should also explain the safety precautions to children in a clear and understandable manner, emphasizing the importance of not touching, tasting, or inhaling the substances.
Constant monitoring ensures a safe learning environment and allows for immediate intervention if any issues arise. Adult guidance transforms this experiment into a valuable and secure educational experience.

Step-by-Step Crystal Growing Instructions
Follow these detailed instructions carefully to successfully grow your own stunning crystals, transforming simple solutions into beautiful, sparkling formations with patience and precision!
Preparing the Solution
The foundation of magnificent crystal growth lies in a meticulously prepared solution. Begin by carefully measuring the specified amount of crystal-growing compound – alum, borax, or Epsom salt – as detailed in your kit’s instructions.
Gradually add this powder to hot water, typically tap water is sufficient, stirring continuously until completely dissolved. Ensure no granules remain at the bottom; undissolved particles can disrupt crystal formation. The water temperature is crucial; hotter water generally allows for more compound to dissolve, leading to larger crystals, but avoid boiling.
Once dissolved, allow the solution to cool slightly before proceeding. Filtering the solution through a coffee filter or paper towel can remove any lingering impurities, resulting in clearer, more vibrant crystals. A saturated solution, holding the maximum amount of dissolved compound, is essential for optimal growth.
Creating the Seed Crystal
A seed crystal acts as the starting point for larger crystal development, providing a surface for new molecules to attach. Often, kits include a pre-made seed crystal, but creating your own is equally rewarding. To do so, take a small amount of the prepared solution and pour it into a shallow dish.
Allow the water to evaporate slowly; as it does, small crystals will begin to form. Select the most well-formed, clear crystal – this will be your seed. Alternatively, you can suspend a small, non-dissolving object (like a piece of string or a pipe cleaner) in the solution to encourage crystal growth directly onto it.
Carefully remove the seed crystal and gently tie it with thread, ensuring it hangs freely within the main solution without touching the sides or bottom of the container. This prevents unwanted crystal clusters.
The Growth Process: Patience is Key
Crystal growth isn’t a rapid process; it demands patience and a stable environment. Once your seed crystal is suspended in the solution, find a quiet, undisturbed location to place your container. Avoid direct sunlight or significant temperature fluctuations, as these can disrupt the delicate crystallization process.
Over the following days and weeks, observe the seed crystal. You should begin to notice gradual growth as molecules from the solution attach themselves to its surface. The rate of growth depends on factors like solution concentration, temperature, and purity.
Regularly check the solution level and add more saturated solution if evaporation occurs, maintaining consistent conditions for optimal crystal development. Resist the urge to frequently check or disturb the setup!
Optimal Temperature for Growth
Maintaining a stable and appropriate temperature is crucial for successful crystal growth. Most crystal growing kits, particularly those utilizing alum, borax, or Epsom salts, thrive within a relatively narrow temperature range – typically between 68°F and 77°F (20°C and 25°C).
Consistent warmth encourages molecules to move and bond effectively, accelerating crystal formation. However, excessively high temperatures can lead to rapid precipitation, resulting in smaller, less defined crystals. Conversely, cooler temperatures may slow growth significantly.
Avoid placing your crystal-growing setup near drafts, radiators, or in direct sunlight. A consistently moderate temperature will yield the most impressive and well-formed crystals.
Avoiding Disturbances During Crystallization
The crystallization process is remarkably sensitive to external vibrations and movements. Even slight disturbances can disrupt the delicate molecular arrangement, leading to imperfect crystal structures or hindering growth altogether. Therefore, maintaining a stable and undisturbed environment is paramount.
Choose a location away from high-traffic areas, slamming doors, or noisy appliances. Avoid bumping or jostling the container holding your growing solution. Consider placing the setup on a sturdy, level surface to minimize accidental vibrations.
Patience is key! Resist the urge to check on your crystals too frequently. Allow the process to unfold naturally, undisturbed, for the best possible results. A calm environment fosters beautiful crystal development.
Troubleshooting Common Issues
Encountering problems is part of the learning process! Addressing issues like lack of formation, cloudiness, or poor shape will enhance your crystal-growing success.

Crystals Not Forming
A common frustration is a solution that refuses to crystallize. Several factors can contribute to this issue, demanding careful investigation. First, ensure the solution is truly saturated – add more solute until no further dissolving occurs.
Secondly, impurities can inhibit crystal growth; use distilled water and clean containers. Temperature plays a crucial role; too cold, and the solution won’t readily form crystals, while too hot might prevent nucleation.
Finally, a lack of a seed crystal, or a poorly prepared one, can hinder the process. Gently introduce a small, well-formed seed crystal to initiate growth. Patience is vital; sometimes, crystals simply require more time to begin appearing, so avoid disturbing the solution prematurely.

Cloudy or Discolored Crystals
If your crystals appear cloudy or exhibit unwanted coloration, impurities are likely the culprit. Even seemingly clean tap water can contain dissolved minerals that interfere with crystal clarity. Always prioritize using distilled or deionized water for optimal results.
Furthermore, the container itself might be leaching impurities; glass or smooth plastic containers are preferable. Avoid metal containers, as they can react with the solution. Dust or particulate matter in the air can also settle and cloud the crystals, so cover the solution during the growth process.
Finally, repeated handling or disturbances can introduce contaminants. Gentle handling and a stable environment are key to achieving pristine, clear crystals.
Small or Poorly Shaped Crystals
If your crystals are developing as small or exhibiting irregular shapes, several factors could be at play. A solution that is not saturated enough will limit crystal growth, so ensure you’ve dissolved the maximum amount of solute possible at the given temperature.
Rapid cooling of the solution can also lead to smaller, less-defined crystals; allow the solution to cool slowly and undisturbed. The seed crystal’s quality significantly impacts the final result – a poorly formed seed will yield a flawed crystal.

Finally, vibrations or disturbances during crystallization disrupt the process, hindering proper formation. A stable, quiet environment is crucial for larger, well-defined crystals.
Harvesting and Displaying Your Crystals
Congratulations on growing your crystals! Now, carefully remove, dry, and preserve these beautiful formations to showcase your scientific achievement with pride and joy.
Removing Crystals from the Solution
Carefully extracting your crystals is crucial to prevent damage. Gently lift the crystal from the solution, avoiding any sudden movements that could cause breakage. A spoon or fork can be helpful, but use caution not to scratch the crystal’s surface.
If the crystal is attached to the growing surface, slowly and patiently try to detach it. Warming the container slightly can sometimes loosen the crystal’s grip, but avoid excessive heat. Once free, immediately rinse the crystal with cool, distilled water to remove any remaining solution.
This rinsing process prevents further growth or a sticky residue from forming as it dries. Handle the crystal delicately throughout the entire removal process, as it will be fragile, especially when first harvested. Remember, patience is key to a successful extraction!
Drying and Preserving Your Crystals
Proper drying is essential to maintain your crystal’s clarity and structure. Gently pat the rinsed crystal dry with a soft, lint-free cloth. Avoid rubbing, as this can cause surface imperfections. Allow the crystal to air dry completely on a clean, cushioned surface, away from direct sunlight or heat sources.
To prevent the crystal from becoming cloudy due to humidity, consider applying a thin coat of clear acrylic spray or mineral oil. This creates a protective barrier. For long-term preservation, store your crystal in a cool, dry place, ideally in a display case or a sealed container with a desiccant packet to absorb moisture.
Handle your preserved crystal with care to avoid scratches or damage, ensuring its beauty lasts for years to come.
Displaying Your Crystal Creations
Showcase your stunning crystal growth with pride! Consider a dedicated display case to protect it from dust and physical damage, enhancing its visual appeal. A dark-colored base, like velvet or felt, will make your crystal stand out beautifully.
Experiment with lighting – a small spotlight or LED strip can illuminate the crystal’s facets, revealing its intricate details. For a more artistic presentation, arrange multiple crystals of varying sizes and shapes together; You can also incorporate natural elements like small stones or dried flowers into the display.
Remember to place your crystal in a stable location, away from direct sunlight and high-traffic areas, ensuring it remains a captivating centerpiece for years.