x670e aorus pro x manual

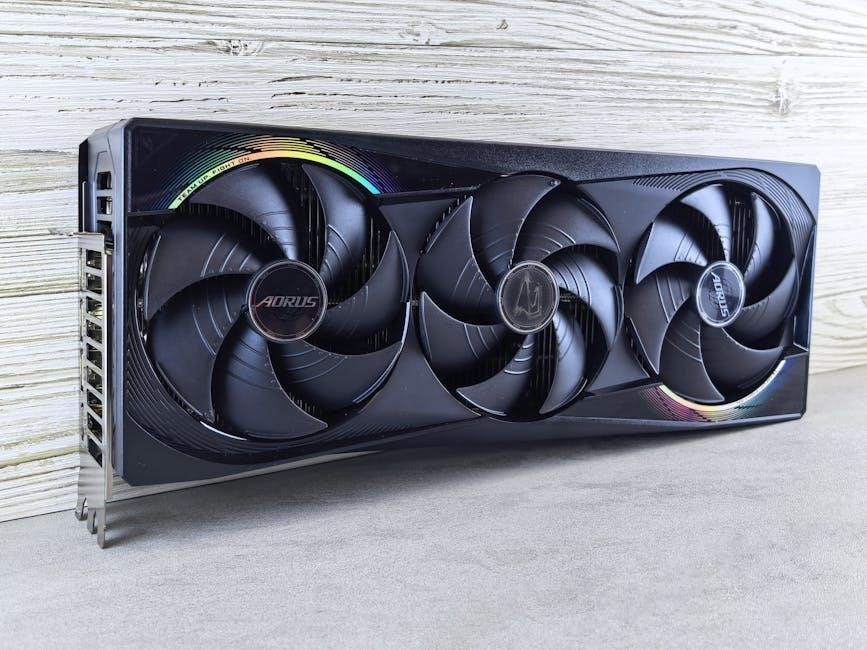
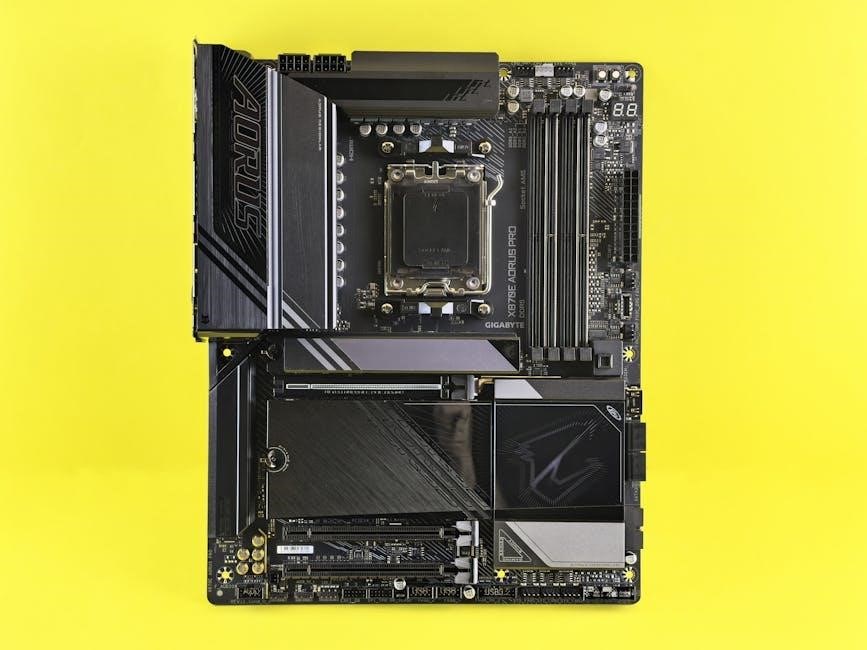
Gigabyte’s X670E AORUS PRO X is a high-performance motherboard, offering robust features and reliable operation.
Free PDF manuals and specifications are readily available online for user guidance and system setup.

Overview of the Motherboard

The Gigabyte X670E AORUS PRO X motherboard is engineered for AMD processors, delivering a solid foundation for powerful computing. Detailed manuals, available as free PDF downloads, guide users through installation and configuration.
It supports fast data transfer and expandability, making it ideal for high-performance systems. The documentation covers specifications, setup, and troubleshooting, ensuring a smooth user experience.

Key Features and Benefits

The X670E AORUS PRO X boasts exceptional features detailed in its comprehensive manual. Benefits include support for advanced processors, fast data speeds, and robust expandability. Free PDF versions of the manual offer guidance on utilizing Smart Fan 5, RGB Fusion 2.0, and BIOS configuration. These resources ensure optimal performance and customization.

Unboxing and Package Contents

The X670E AORUS PRO X package includes the motherboard and essential accessories. Consult the manual for a complete list of included items and initial inspection guidance.

What’s Included in the Box

Upon unboxing the Gigabyte X670E AORUS PRO X, users will find the motherboard itself, alongside several crucial components. The comprehensive package includes the I/O shield, installation manual, SATA cables for storage devices, and M.2 screws and standoffs. Additionally, a G-Connector kit simplifies front panel connections. Detailed illustrations within the manual clearly identify each item, ensuring a smooth setup process and confirming all necessary parts are present.

Initial Inspection

Before proceeding, carefully inspect the Gigabyte X670E AORUS PRO X motherboard for any physical damage incurred during shipping. Verify all components listed in the manual are present and undamaged. Examine the CPU socket for bent pins, and check the PCIe slots for debris. A thorough initial inspection, guided by the manual, prevents potential issues during installation and ensures a stable system build.

Motherboard Specifications

Gigabyte’s X670E AORUS PRO X specifications, detailed in the manual, cover chipset support, memory compatibility, and expansion slot configurations for optimal system building.

Chipset and Processor Support

The X670E AORUS PRO X motherboard, as outlined in its manual, is engineered for AMD Ryzen 7000 Series processors. It leverages the AMD X670E chipset, delivering exceptional performance and features. The manual details socket compatibility (AM5) and supported CPU generations, ensuring users select compatible processors for optimal system functionality and future upgrade paths.

Memory Support (RAM)

The X670E AORUS PRO X manual specifies support for DDR5 memory, maximizing bandwidth for demanding applications. It features four DIMM slots, enabling configurations up to 128GB. The manual details supported memory speeds, including overclocking capabilities via XMP profiles, allowing users to optimize RAM performance for enhanced system responsiveness and stability.

Expansion Slots (PCIe)

The X670E AORUS PRO X manual outlines several PCIe slots for graphics cards and expansion cards. It includes PCIe 5.0 x16 for the latest GPUs, ensuring maximum bandwidth. Additional PCIe 4.0 and 3.0 slots accommodate various add-in cards. The manual details slot configurations and bandwidth allocation for optimal component compatibility.

Installing the CPU and Cooler

The X670E AORUS PRO X manual details CPU socket installation and cooler mounting procedures. It emphasizes compatibility and proper thermal paste application for optimal performance.

CPU Socket and Installation

The Gigabyte X670E AORUS PRO X manual provides detailed instructions for CPU installation. Carefully lift the socket lever before gently placing the AMD processor into the socket, aligning the arrow markings. Ensure the CPU sits flush, then close the lever to secure it. Incorrect installation can cause damage, so follow the manual’s guidance precisely for a stable and functional system.

Cooler Compatibility and Mounting

The X670E AORUS PRO X manual details cooler compatibility and mounting procedures. It supports various CPU coolers, including air and liquid cooling solutions. The manual illustrates bracket installation for different cooler types. Proper mounting ensures optimal heat dissipation, preventing overheating and maintaining system stability. Always refer to the manual for specific cooler requirements and secure attachment.

Memory Installation and Configuration

The X670E AORUS PRO X manual guides DIMM slot configuration and XMP profile setup. It ensures optimal RAM performance and system stability through proper installation.

DIMM Slot Configuration

The Gigabyte X670E AORUS PRO X manual details crucial DIMM slot configurations for dual- or quad-channel memory operation. Proper population is vital for maximizing bandwidth and performance.
The manual illustrates which slots to populate first when using two or four RAM modules, ensuring correct channel interleaving.
Referencing the diagram within the manual guarantees optimal memory configuration for your specific RAM kit.

XMP Profile Setup

The X670E AORUS PRO X manual guides users through enabling XMP (Extreme Memory Profile) for optimized RAM performance. Access the BIOS and locate the XMP setting, typically within the overclocking or memory configuration section.
Selecting the appropriate XMP profile automatically configures the RAM to its advertised speeds and timings, enhancing system responsiveness.

Storage Device Installation

The X670E AORUS PRO X manual details M.2 SSD and SATA HDD/SSD installation procedures. It provides clear diagrams for proper mounting and connection within the system.

M.2 SSD Installation

The Gigabyte X670E AORUS PRO X manual provides detailed instructions for installing M.2 Solid State Drives. It specifies locating the M.2 slots on the motherboard and securing the SSD with a screw.
The manual emphasizes proper alignment and cautions against excessive force during installation. It also highlights the importance of heat dissipation for optimal performance, potentially requiring a heatsink.

SATA HDD/SSD Installation

The X670E AORUS PRO X manual details SATA HDD/SSD installation, outlining the location of SATA ports. It instructs users to connect the SATA data cable from the drive to the motherboard and a SATA power cable from the power supply.
The manual stresses ensuring secure connections for stable operation and proper data transfer.

Connecting Front Panel Connectors

The X670E AORUS PRO X manual guides users through connecting power, reset, LEDs, USB, and audio front panel connectors for proper system functionality.

Power Button, Reset Button, and LEDs

The Gigabyte X670E AORUS PRO X manual details the precise locations for connecting the front panel power and reset buttons. It also illustrates the correct orientation for various LED connections, including power, HDD activity, and system status indicators.
Careful adherence to the manual’s diagrams ensures proper functionality and avoids potential short circuits during system assembly. Proper connection is vital for a smooth boot process.

USB and Audio Connectors

The X670E AORUS PRO X manual provides detailed diagrams illustrating the placement of USB 2.0, USB 3.2 Gen 1, and USB 3.2 Gen 2 connectors. It also clearly shows the audio panel connections, including front panel audio, S/PDIF, and microphone inputs. Correctly connecting these ensures full functionality of peripherals and audio devices.

Rear Panel I/O Connections

The X670E AORUS PRO X manual details the rear panel’s USB ports, audio jacks, network connections, and display outputs for optimal device integration.

USB Ports and Audio Jacks

According to the X670E AORUS PRO X manual, the rear panel boasts a comprehensive array of USB ports, including USB 3.2 Gen 2×2 Type-C and multiple USB 3.2 Gen 1 ports.
These facilitate high-speed data transfer for various peripherals. Furthermore, gold-plated audio jacks deliver exceptional sound quality, supporting multi-channel audio configurations for an immersive experience.

Network and Display Outputs

The X670E AORUS PRO X manual details its robust connectivity options. It features a high-speed Ethernet port for reliable network access, alongside multiple display outputs including HDMI and DisplayPort.
These support high-resolution gaming and content creation. These outputs ensure compatibility with a wide range of monitors and displays.

BIOS Setup and Configuration

The X670E AORUS PRO X manual guides users through BIOS access, boot order adjustments, and advanced overclocking options for optimal system performance.

Accessing the BIOS

According to the X670E AORUS PRO X manual, entering the BIOS setup is typically achieved by pressing the “Delete” key repeatedly during the system’s power-on self-test (POST).
Alternatively, the “F2” key might be utilized, depending on the boot configuration.

Ensure quick key presses immediately after powering on to successfully enter the BIOS interface, allowing for system configuration.

Boot Order Configuration

The X670E AORUS PRO X manual details boot order settings within the BIOS. Users can prioritize devices – like SSDs, HDDs, or USB drives – to determine the system’s startup sequence.
Adjusting this order ensures the operating system loads from the desired source, crucial for dual-boot setups or troubleshooting boot failures.

Overclocking Options

The X670E AORUS PRO X manual outlines extensive overclocking features. Users can adjust CPU multipliers, voltages, and memory timings within the BIOS to enhance performance.
Detailed guidance is provided for stable overclocking, emphasizing the importance of adequate cooling and careful monitoring to prevent system instability or damage.

Fan Control and Monitoring

The X670E AORUS PRO X manual details “Smart Fan 5” features, enabling precise fan speed control and comprehensive temperature monitoring for optimal cooling.

Smart Fan 5 Features

Gigabyte’s Smart Fan 5, as outlined in the X670E AORUS PRO X manual, provides advanced fan control. Users gain multiple fan headers and customizable fan curves, responding to various sensors.
This allows for optimized cooling and quieter operation. It supports both PWM and voltage-controlled fans, offering flexibility and precision for thermal management within the system.

Temperature Monitoring

The X670E AORUS PRO X manual details comprehensive temperature monitoring capabilities. The motherboard features numerous thermal sensors strategically placed to track CPU, GPU, and chipset temperatures. This data is accessible through the BIOS and Gigabyte’s monitoring software, enabling users to proactively manage system heat and ensure stable performance.

RGB Fusion 2.0 Customization

The X670E AORUS PRO X manual explains RGB Fusion 2.0 software installation for lighting effects and synchronization, enhancing system aesthetics.

Software Installation

Gigabyte’s X670E AORUS PRO X manual details the RGB Fusion 2.0 software installation process. Users can download the software from the official Gigabyte website. The manual provides step-by-step instructions for a smooth installation, ensuring compatibility with the motherboard. This software unlocks extensive customization options for the integrated RGB lighting, allowing users to personalize their system’s appearance.

Lighting Effects and Synchronization

The X670E AORUS PRO X manual explains RGB Fusion 2.0’s diverse lighting effects. Users can choose from static, breathing, and wave modes, customizing colors and speeds. Synchronization with other compatible RGB components is also detailed, creating a unified aesthetic. The manual guides users through setting up profiles and saving preferred lighting configurations.

Troubleshooting Common Issues

The X670E AORUS PRO X manual addresses issues like “No POST” and USB port problems, offering diagnostic steps and potential solutions for users.

No POST (Power-On Self-Test)

If the system fails to POST, the X670E AORUS PRO X manual suggests checking power connections to the motherboard and all components. Verify RAM seating, CPU installation, and the graphics card.
A clear CMOS reset can resolve configuration issues. Consult the manual’s troubleshooting section for beep code interpretations, aiding in pinpointing the source of the problem for a successful boot.

USB Port Problems

Addressing USB port issues on the X670E AORUS PRO X, the manual recommends checking USB device compatibility and ensuring proper connection. Reinstalling USB drivers, found on the Gigabyte support website, often resolves conflicts. Verify BIOS settings for USB configuration and power delivery. A CMOS reset might also restore functionality if settings are corrupted.

Driver Installation

Essential drivers for the X670E AORUS PRO X are downloadable from Gigabyte’s official website. The manual guides users through chipset and peripheral driver installation procedures.

Downloading and Installing Drivers

To ensure optimal performance, download the latest drivers for your Gigabyte X670E AORUS PRO X motherboard from the official Gigabyte website. The manual directs users to the support section, providing a clear path to locate and download chipset, audio, LAN, and USB drivers.

Follow the installation instructions carefully, often involving running executable files and restarting your system. Proper driver installation guarantees hardware compatibility and unlocks the full potential of your components.

Chipset Drivers

Essential for system stability, the X670E AORUS PRO X chipset drivers manage communication between the CPU and other components. The manual emphasizes downloading these directly from Gigabyte’s support page to ensure compatibility and avoid potential conflicts.

Installation typically involves running an executable file, prompting a system restart. Updated chipset drivers enhance overall system performance and enable advanced features of the motherboard.

Updating the BIOS

The X670E AORUS PRO X supports BIOS updates via Q-Flash Plus, allowing flashing without a CPU or RAM.
Refer to the manual for detailed procedures and precautions.

Q-Flash Plus Feature

Q-Flash Plus, a standout feature of the Gigabyte X670E AORUS PRO X, enables users to update the BIOS without needing a CPU, RAM, or even a graphics card installed. This is incredibly useful for resolving compatibility issues or updating to the latest features. Simply download the BIOS file to a USB drive, connect it to the designated port, and initiate the flash process via the dedicated button on the rear I/O panel – all detailed in the motherboard’s manual.

BIOS Update Procedure

To update the X670E AORUS PRO X BIOS, first download the latest version from Gigabyte’s official website. Using Q-Flash Plus, insert a USB drive with the BIOS file into the designated port. Power on the system and press the Q-Flash Plus button until the update begins. The manual stresses maintaining power during this process; interruption can cause system instability.

Manual Download and Resources

The X670E AORUS PRO X manual is available as a free PDF download from Gigabyte’s website, alongside guides and specifications.

Official Gigabyte Website

Gigabyte’s official website serves as the primary hub for accessing the X670E AORUS PRO X manual and related resources. Users can locate comprehensive documentation, including PDF versions, specifications, and frequently asked questions;
The website provides direct links to download the latest manuals, ensuring users have access to the most current information for optimal system configuration and troubleshooting.

PDF Manual Availability

PDF versions of the Gigabyte X670E AORUS PRO X manual are widely accessible online, offering convenient offline access to detailed instructions. These manuals, typically spanning 42 pages, cover all aspects of the motherboard, from installation to BIOS configuration.
Users can easily download and view these PDF documents for comprehensive guidance.

Warranty Information

Gigabyte provides warranty coverage for the X670E AORUS PRO X. Refer to the official website or included manual for specific details regarding the RMA process.

Warranty Coverage

Gigabyte offers standard warranty protection for the X670E AORUS PRO X motherboard, safeguarding against manufacturing defects. The duration and specific terms are detailed within the product manual and on the official Gigabyte website.
Coverage typically includes repair or replacement of faulty components. However, damage caused by misuse, overclocking, or unauthorized modifications may void the warranty. Always retain proof of purchase for warranty claims.

RMA Process

To initiate a Return Merchandise Authorization (RMA) for your X670E AORUS PRO X, consult the manual or Gigabyte’s website for detailed instructions. You’ll typically need to submit an online RMA request with proof of purchase and a description of the issue. Gigabyte will then provide shipping instructions and an RMA number for tracking.

instructions for quiz

Quizzes are versatile tools, easily created via platforms like Google Forms and Quizizz, offering diverse applications from education to business verification.

Utilizing quizzes boosts engagement, assesses knowledge, and provides valuable data for improvement, enhancing learning and promotional strategies effectively.

What is a Quiz?

A quiz is fundamentally an assessment tool designed to measure knowledge, aptitude, or skills. It presents a series of questions – ranging from simple recall to complex problem-solving – to evaluate a participant’s understanding of a specific subject.

Quizzes aren’t limited to traditional academic settings; they manifest in various forms, including online questionnaires, interactive games (like those found on Quizizz), and even embedded verification processes like Google Business Profile confirmation.

The core function remains consistent: to gauge comprehension and provide feedback. Modern quizzes, especially those created with tools like Google Forms, can automatically score responses and offer immediate results, streamlining the assessment process and making it more engaging for participants.

Why Use Quizzes?

Quizzes offer a multitude of benefits, extending far beyond simple knowledge assessment. They significantly boost engagement, transforming passive learning into an interactive experience, particularly with gamified platforms like Quizizz.

For businesses, quizzes serve as powerful promotional tools, aiding in Google Business Profile verification and attracting customer attention. They provide valuable data insights, identifying areas where understanding is lacking, allowing for targeted improvements in content or training.

Furthermore, quizzes facilitate efficient knowledge retention and can be seamlessly integrated with other tools, such as Gmail signatures, to broaden reach. Utilizing add-ons allows for the creation of entire online courses, demonstrating their versatility.

Platforms for Creating Quizzes

Numerous platforms exist, including Google Forms, Quizizz, Google Classroom, Microsoft Excel, and PowerPoint/Google Slides, offering diverse quiz creation capabilities.

Google Forms for Quizzes

Google Forms provides a straightforward method for creating quizzes. Access the form settings and select “Make this a quiz” to enable quiz features. You can then customize options like showing results immediately after submission or later, along with detailed answer keys and point values for each question.

Within Google Forms, you can add various question types, including multiple choice, short answer, and paragraph questions. It’s important to note that Google Surveys, a related tool, does not support matrix or grid-style questions, as these can lead to survey abandonment.

Google Forms seamlessly integrates with other Google Workspace tools, making it easy to share and analyze quiz data. It’s a versatile option for educators and businesses alike;

Quizizz: A Gamified Quiz Platform

Quizizz transforms traditional quizzes into engaging, game-like experiences. Creating a quiz on quizizz.com is remarkably easy, allowing users to build assessments from scratch or leverage the “Teleport” feature to import pre-made questions from other Quizizz quizzes.

The platform offers various question types and customization options, fostering a competitive and fun learning environment. Teachers can track student progress and identify areas needing improvement through detailed reports.

Quizizz is particularly effective for classroom engagement and remote learning. Its gamified elements, such as power-ups and leaderboards, motivate students and enhance knowledge retention. It’s a dynamic alternative to standard quiz formats.

Google Classroom Quizzes

Creating a quiz assignment within Google Classroom is a straightforward process. Begin by accessing your chosen class and clicking “Create,” then selecting “Quiz assignment.” This automatically links the assignment to Google Forms, where the quiz itself is constructed.

Within Google Forms, you’ll find a “Quizzes” tab in the settings. Enable “Make this a quiz” and customize options like releasing grades immediately or locking down browsers for enhanced security.

Once the quiz is complete in Forms, it’s automatically saved back to Google Classroom. Students receive notifications and can access the quiz directly from their Classroom stream. Grading is simplified, and feedback can be provided efficiently.

Microsoft Excel Quizzes

Believe it or not, creating quizzes directly within Microsoft Excel is possible – and code-free! This method allows for a surprising level of customization and flexibility in question design and scoring.

The process involves utilizing Excel’s formulas and features to build interactive questions. You can incorporate dropdown menus for multiple-choice answers, use conditional formatting to provide immediate feedback, and employ formulas to automatically calculate scores.

This approach is particularly useful for creating self-grading quizzes or assessments that can be easily distributed and completed offline. It’s a resourceful solution for educators or trainers seeking a unique and accessible quiz format, requiring no programming knowledge.

PowerPoint/Google Slides Quiz Templates (Quiz Quiz Trade)

Looking for a dynamic and engaging way to conduct quizzes? The “Quiz Quiz Trade” method, facilitated by readily available PowerPoint and Google Slides templates, offers a collaborative learning experience.

This innovative approach involves students creating their own quiz questions, then “trading” them with classmates to answer. Each student becomes both a quizmaster and a quiz-taker, fostering active participation and peer teaching.

Editable templates simplify the setup process, allowing for easy customization of questions and answers. This method is perfect for review sessions, quick knowledge checks, or sparking classroom discussions. It’s a versatile and interactive alternative to traditional quiz formats.

Designing Effective Quiz Questions

Crafting impactful quizzes requires diverse question types, clear wording, and relevance to learning objectives, avoiding complex matrix questions for optimal participant engagement.

Types of Quiz Questions

Quiz platforms support a variety of question formats to cater to different learning styles and assessment needs. Multiple-choice questions are popular for testing recall and understanding, offering several answer options. True/False questions provide a quick assessment of factual knowledge, though they can be prone to guessing.

Short-answer questions require more detailed responses, evaluating comprehension and critical thinking. Fill-in-the-blank questions test specific knowledge recall, while matching questions assess relationships between concepts. Quizizz allows for engaging question types like polls and open-ended questions, fostering interactive learning. The choice of question type should align with the learning objectives and the desired level of cognitive engagement.

Avoiding Matrix/Grid Questions (Google Surveys Limitation)

Google Surveys presents a notable limitation: it does not support matrix or grid-style questions. These question types, featuring response categories across the top and questions down the side, are often complex for participants. Research (Brecko & Carstens, 2006) indicates they frequently lead to survey abandonment due to increased cognitive load and user frustration.

Therefore, when designing quizzes intended for use within Google Surveys, it’s crucial to avoid this format. Instead, restructure questions into individual, standalone items. This ensures a smoother user experience and higher completion rates. Consider breaking down grid questions into a series of simpler, more focused inquiries to maintain data quality and participant engagement.

Writing Clear and Concise Questions

Effective quiz questions demand clarity and conciseness. Ambiguity leads to misinterpretation and inaccurate results. Focus on a single idea per question, avoiding double-barreled questions that ask about multiple concepts simultaneously. Use simple language, avoiding jargon or overly complex phrasing that might confuse participants.

Keep questions brief and to the point. Long, rambling questions can overwhelm respondents and decrease engagement. Ensure the question’s intent is immediately obvious. Review each question critically, asking if it could be reworded for greater clarity. A well-crafted question maximizes the validity and reliability of your quiz data.

Ensuring Questions are Relevant

Quiz questions must directly align with the learning objectives or the information you’re assessing. Irrelevant questions frustrate participants and invalidate the quiz’s purpose. Consider your target audience and their existing knowledge base when crafting questions; tailor the difficulty accordingly.

Each question should contribute to a broader understanding of the topic. Avoid including trivial or extraneous details that don’t support the core concepts. Relevance also extends to real-world applications – connecting quiz content to practical scenarios enhances engagement and demonstrates value. A focused and relevant quiz provides meaningful insights and reinforces key takeaways.

Setting Up and Managing Quizzes

Effective quiz management involves controlling access, setting appropriate time limits, and choosing scoring options to suit your assessment goals.

Displaying results promptly provides valuable feedback, aiding participant learning and understanding their performance on the quiz material.

Quiz Access Control

Controlling access to your quizzes is crucial for maintaining integrity and ensuring the right audience participates. Within Google Classroom, creating a quiz assignment restricts access to enrolled students only, streamlining distribution and collection.

Platforms like Quizizz offer various access methods, including class codes for immediate entry or direct links for specific individuals. You can also set start and end dates, limiting availability to a defined timeframe.

Furthermore, consider password protection for sensitive assessments. Carefully managing these settings prevents unauthorized participation and ensures accurate data collection, vital for reliable results and fair evaluation.

Proper access control safeguards the validity of your quiz and protects the learning experience for all participants.

Setting Time Limits

Implementing time limits on quizzes can significantly impact performance and discourage searching for answers. Most platforms, including Google Forms when configured as a quiz, allow you to specify a duration for completion.

Quizizz also provides robust time control features, enabling you to set overall quiz timers or even individual time limits per question, increasing the challenge and promoting quick thinking.

Consider the complexity of the questions and the intended assessment goal when determining appropriate timeframes. Shorter limits encourage recall, while longer limits allow for more in-depth reasoning.

Clearly communicate the time limit to participants beforehand to manage expectations and reduce anxiety. Effective time management is a valuable skill, and quizzes can help foster it.

Scoring and Grading Options

Quiz platforms offer diverse scoring and grading functionalities. Google Forms, when set as a quiz, automatically grades multiple-choice and true/false questions, providing immediate feedback.

Quizizz allows for point values to be assigned to each question, and offers options for team-based scoring and leaderboards, gamifying the assessment process.

Manual grading may be necessary for open-ended questions or those requiring subjective evaluation. Some platforms facilitate this by allowing instructors to review responses directly within the system.

Consider weighting questions based on difficulty or importance. Providing detailed feedback alongside scores is crucial for learning and improvement. Clear grading rubrics enhance transparency and fairness.

Showing Quiz Results to Participants

Google Forms allows instructors to choose whether to immediately release quiz scores to students after submission, or to review them first. Detailed response statistics are also available.

Quizizz provides real-time results and reports, displaying individual and class performance. Participants can see their scores and correct answers, fostering a competitive learning environment.

Transparency regarding results is vital for learning. Showing correct answers and explanations helps students understand their mistakes and reinforce knowledge.

Consider offering personalized feedback alongside scores, highlighting areas of strength and weakness. Anonymized class results can also spark discussion and peer learning.

Ensure privacy settings are appropriate when sharing results, especially in sensitive contexts.

Advanced Quiz Features

Quizizz’s “Teleport” feature simplifies question sourcing, while add-ons enable the creation of comprehensive online courses without coding expertise.

Using the “Teleport” Feature (Quizizz)

Quizizz offers a remarkably efficient feature called “Teleport,” designed to streamline quiz creation. This allows users to effortlessly incorporate pre-made questions from a vast library created by other educators.

To utilize Teleport, simply navigate to quizizz.com and begin creating a new quiz. Instead of manually typing questions, you can search for existing questions based on keywords or topics.

Once found, these questions can be instantly “teleported” into your quiz with a single click. This saves significant time and effort, especially when building quizzes on diverse or complex subjects.

The feature is a fantastic resource for quickly populating quizzes with high-quality, vetted content, fostering collaborative learning and reducing workload for quiz creators.

Creating Online Courses with Add-ons

Transforming quizzes into comprehensive online courses is now accessible without coding expertise, thanks to add-ons like “Courses.” These tools integrate seamlessly with platforms like Google Classroom, expanding functionality beyond simple assessments.

With the “Courses” add-on, you can develop visually appealing course websites, structuring content into modules and lessons. This allows for a more organized and engaging learning experience for participants.

The classroom mode within these add-ons facilitates the creation of beautiful, interactive course materials. You can incorporate quizzes as integral components of these courses, tracking student progress and providing feedback.

This approach empowers educators and trainers to deliver structured online learning experiences, leveraging the power of quizzes to reinforce knowledge and assess understanding effectively.

Utilizing Quizzes for Business

Quizzes aid business verification via Google Business Profile, boosting visibility on Search and Maps, while also serving as engaging promotional tools.

Google Business Profile Verification

Leveraging quizzes can be a surprisingly effective method for verifying your business with Google. When you add or claim your Business Profile, ensuring its accuracy is paramount for visibility on Google Search and Maps.

While not a direct verification step within the Google Business Profile system itself, quizzes can indirectly support verification by demonstrating genuine engagement and activity associated with your business. Creating a quiz related to your industry or products, and then promoting it, signals to Google that your business is active and relevant.

Furthermore, quizzes can be shared via links, including within a Gmail signature, driving traffic and potentially increasing brand recognition, which contributes to a stronger online presence and a more easily verifiable profile. Access the official Google Business Profile Help Center for detailed guidance on the standard verification processes.

Promoting Your Business with Quizzes

Quizzes offer a dynamic and engaging avenue for promoting your business, extending beyond traditional advertising methods. They attract attention and encourage interaction, fostering a stronger connection with potential customers.

Strategically designed quizzes, relevant to your industry and target audience, can subtly showcase your expertise and product knowledge. Sharing these quizzes through social media, email marketing (including Gmail signatures with quiz links), and your website drives traffic and generates leads.

Moreover, quizzes can be used to collect valuable customer data, providing insights into preferences and needs. This information can then be used to personalize marketing efforts and improve customer engagement. Consider utilizing platforms like Quizizz for gamified experiences that further enhance promotion and brand recall.

Integrating Quizzes with Other Tools

Seamlessly link quizzes via Gmail signatures and leverage New Bing Chat (in Creative mode) for efficient quiz creation and integration into existing workflows.

Gmail Signatures and Quiz Links

Enhance outreach and engagement by incorporating quiz links directly into your Gmail signature. An email signature serves as an automatic footer, displaying your contact details or preferred quotes with every message sent.

To create a signature with a quiz link, simply copy the shareable link from your quiz platform (Google Forms, Quizizz, etc.). Then, navigate to your Gmail settings, find the “Signature” section, and paste the link into your signature text.

This allows recipients to easily access and participate in your quizzes, promoting learning, gathering feedback, or even driving traffic to your business profile for verification purposes; It’s a simple yet effective method for wider distribution and increased participation.

New Bing Chat for Quiz Creation (Creative Mode)

Leverage the power of New Bing Chat to streamline quiz creation. Access Bing Chat via http://bing.com/create and initiate a conversation. To unlock its full potential for quiz generation, ensure you set the conversation style to “Creative” mode.

This mode encourages more imaginative and detailed responses, ideal for crafting engaging quiz questions and answer options. Simply prompt Bing Chat with your quiz topic and desired question types.

Experiment with different prompts to refine the output. Remember that “Creative” mode prioritizes originality, while “Balanced” and “Precise” modes focus on accuracy. Bing Chat offers a convenient and innovative approach to quickly developing quiz content.

Analyzing Quiz Results

Understanding performance data reveals strengths and weaknesses. Identify areas needing improvement by examining responses and utilizing insights from Google’s help center.

Understanding Performance Data

Analyzing quiz results goes beyond simply seeing scores; it’s about extracting meaningful insights. Platforms provide data on individual question performance, revealing which concepts students grasp and where difficulties lie.

Look for patterns in incorrect answers – are students consistently misunderstanding a specific type of question? This indicates a need to revisit the underlying material. Google’s official help resources offer guidance on interpreting these metrics.

Consider response times; unusually long times on a question might suggest it’s too complex or poorly worded. Utilize this data to refine future quizzes and improve overall learning outcomes, ensuring quizzes effectively measure understanding.

Identifying Areas for Improvement

Quiz performance data pinpoints specific areas needing attention. Consistently low scores on particular questions signal a gap in understanding that requires re-teaching or alternative explanations.

Review questions flagged as difficult; are they ambiguous, poorly worded, or testing trivial details? Refine these questions for clarity and relevance. Avoid matrix questions, as Google Surveys data suggests they can lead to survey abandonment.

Furthermore, analyze overall quiz completion rates. A high dropout rate might indicate the quiz is too long or challenging. Use these insights to iterate on quiz design, enhancing its effectiveness as a learning and assessment tool.

Resources and Further Learning

Explore official Google Help Centers for detailed guidance. Numerous online tutorials and guides offer practical tips for creating and managing effective quizzes.

Official Google Help Centers

Google provides comprehensive support documentation for its quiz creation tools. The Google Forms Help Center offers detailed articles and tutorials covering everything from basic form setup to advanced quiz features, including settings for making a form a quiz and controlling result visibility;

For Google Classroom, the official Help Center guides users through creating and managing quiz assignments, offering step-by-step instructions and troubleshooting tips. Google Business Profile Help provides resources for utilizing quizzes for verification and promotion.

These resources are regularly updated and offer a reliable source of information for maximizing the potential of Google’s quiz functionalities, ensuring users can effectively design, deploy, and analyze quiz results.

Online Tutorials and Guides

Numerous online resources supplement the official Google documentation, offering diverse perspectives and practical examples for quiz creation. Platforms like YouTube host a wealth of video tutorials demonstrating how to build quizzes in Google Forms, Quizizz, and even Microsoft Excel.

Websites and blogs provide step-by-step guides on designing effective quiz questions, utilizing features like the “Teleport” function in Quizizz, and integrating quizzes with other tools like Gmail. Specifically, guides detail creating Quiz Quiz Trade cards using PowerPoint or Google Slides templates.

These external resources often showcase innovative approaches and best practices, empowering users to create engaging and impactful quizzes tailored to their specific needs and audiences.

solving two-step equations word problems worksheet pdf with answers

Article Plan: Solving Two-Step Equations Word Problems Worksheet PDF with Answers

This comprehensive guide details resources for mastering two-step equation word problems, including free printable PDFs, varying difficulty levels, and answer key analysis for effective learning.

Embarking on the journey of algebra requires a solid grasp of fundamental concepts, and two-step equations are a crucial stepping stone. These equations, as the name suggests, necessitate two operations – addition, subtraction, multiplication, or division – to isolate the variable and determine its value.

Understanding these equations isn’t merely about memorizing steps; it’s about developing logical thinking and problem-solving skills. This is where word problems come into play. They bridge the gap between abstract equations and real-world scenarios, demanding students to translate verbal descriptions into mathematical expressions.

Worksheets, particularly in PDF format, offer a convenient and accessible method for focused practice. They allow students to build confidence and proficiency at their own pace, reinforcing the core principles of equation solving.

What are Two-Step Equations?

Two-step equations are algebraic equations that require precisely two steps to solve for the unknown variable. Unlike one-step equations, they involve two different operations that must be undone in the correct order. Typically, these operations include addition/subtraction and multiplication/division.

For example, an equation like 2x + 3 = 7 requires first subtracting 3 from both sides, and then dividing both sides by 2 to isolate ‘x’. The key is to perform inverse operations – doing the opposite of what’s being done to the variable – to maintain the equation’s balance.

Mastering these equations is foundational for tackling more complex algebraic problems, and worksheets provide targeted practice to build this essential skill.

Why Use Worksheets for Practice?

Worksheets are an invaluable tool for solidifying understanding of two-step equations. They offer focused, repetitive practice, crucial for building fluency and confidence. Unlike textbook examples, worksheets often present a wider variety of problems, exposing students to diverse scenarios and reinforcing problem-solving skills.

PDF worksheets are particularly convenient – easily printable and accessible for practice anywhere, anytime. The availability of answer keys allows for self-assessment and immediate feedback, identifying areas needing further attention.

Furthermore, worksheets with varying difficulty levels cater to different learning paces, ensuring all students are appropriately challenged and supported in their learning journey.

Understanding Word Problems

Successfully tackling these problems requires dissecting information, translating phrases into equations, and clearly defining variables to represent unknown quantities effectively.

Identifying Key Information

The first crucial step in solving word problems is pinpointing the essential data. Often, word problems contain extraneous information designed to mislead students. Carefully read the problem multiple times, highlighting or underlining numerical values and keywords that indicate mathematical operations.

Ask yourself: What is the problem asking me to find? What quantities are known? What relationships exist between these quantities? For example, phrases like “sum,” “difference,” “product,” and “quotient” signal specific operations. Identifying these key elements allows you to filter out irrelevant details and focus on constructing a meaningful equation. Recognizing what isn’t needed is just as important as knowing what is.

Translating Words into Mathematical Expressions

Successfully converting word problems into equations requires understanding common mathematical phrases. Words like “is,” “equals,” or “results in” typically translate to an equals sign (=). “More than” or “increased by” indicate addition (+), while “less than” or “decreased by” signify subtraction (-).

Multiplication (x) can be represented by words like “product,” “times,” or “of.” Division (/) is indicated by “quotient,” “divided by,” or “per.” Practice recognizing these verbal cues and replacing them with their corresponding symbols. This skill bridges the gap between the problem’s narrative and the algebraic equation needed for a solution. Accurate translation is fundamental to correct problem-solving.

Defining Variables in Word Problems

Choosing appropriate variables is crucial for clarity and accuracy when solving word problems. Typically, use letters like ‘x’, ‘y’, or ‘n’ to represent unknown quantities. Clearly state what each variable represents; for example, “Let x = the number of apples.” This prevents confusion and aids in understanding the equation’s components.

Avoid using letters that already have established mathematical meanings (like ‘π’ or ‘e’). A well-defined variable makes the equation more interpretable and simplifies the process of checking your answer. Consistent variable usage throughout the problem is also essential for maintaining logical flow and avoiding errors.

Solving Two-Step Equation Word Problems: A Step-by-Step Guide

Mastering these problems requires a systematic approach: understand, define, write, solve, and always verify your solution for accuracy and comprehension.

Step 1: Read and Understand the Problem

Carefully dissecting the word problem is paramount. Begin by reading the entire problem at least twice, focusing on identifying the unknown quantity. What is the question actually asking you to find? Highlight or underline key information – numbers, relationships, and the ultimate goal.

Pay close attention to the wording; phrases like “sum,” “difference,” “product,” and “quotient” signal specific mathematical operations. Visualize the scenario described. For example, if the problem involves sharing items, think about equal distribution.

Before attempting any calculations, ensure you grasp the context. Ask yourself: Does the answer need to be a whole number? Are there any realistic limitations to the solution? A solid understanding at this stage prevents errors later on.

Step 2: Define the Variable

Assign a variable to represent the unknown quantity identified in Step 1. Commonly, ‘x’ is used, but you can choose any letter. Crucially, clearly state what the variable represents within the context of the problem. For instance, don’t just write “x = “; instead, write “x = the number of pieces she started with.”

This step is vital for translating the word problem into a mathematical equation. A well-defined variable eliminates ambiguity and makes the subsequent steps more manageable. Avoid using variables that already have established mathematical meanings (like ‘π’).

Consistent variable usage throughout the problem-solving process is key to accuracy. A clear definition prevents confusion and ensures your final answer is interpretable.

Step 3: Write the Equation

Translate the word problem’s information into a mathematical equation using the variable defined in Step 2. Carefully consider keywords like “sum,” “difference,” “product,” and “quotient” to determine the correct operations. For example, “ten pieces for herself” might translate to “- 10” in the equation.

Re-read the problem to ensure all relevant information is incorporated. Pay attention to relationships between quantities. The equation should accurately reflect the scenario described. Remember to represent “evenly divided” with division.

A correctly formed equation is the foundation for solving the problem. Double-check your equation before proceeding to Step 4.

Step 4: Solve the Equation

Now, isolate the variable by performing inverse operations in the correct order. Begin by addressing any addition or subtraction, then tackle multiplication or division. Remember the golden rule: whatever operation is performed on one side of the equation must also be performed on the other to maintain balance.

For instance, if the equation involves subtracting a number, add that number to both sides. If it involves multiplication, divide both sides. Simplify each side after each operation.

Continue until the variable stands alone on one side of the equation. The value remaining on the other side is the solution to the word problem.

Step 5: Check Your Answer

Verification is crucial! Substitute the solution you obtained back into the original equation. This confirms whether your answer accurately reflects the problem’s conditions. If both sides of the equation are equal after substitution, your solution is correct.

Don’t skip this step – it’s a powerful way to catch errors. If the equation doesn’t balance, carefully review your steps, looking for mistakes in the inverse operations or equation setup.

Checking also involves considering the context of the word problem. Does your answer make logical sense within the given scenario?

Types of Two-Step Equation Word Problems

Explore diverse problem structures, including those involving addition/multiplication, subtraction/division, and scenarios incorporating fractions and decimals for comprehensive practice.

Problems Involving Addition and Multiplication

These problems typically present a scenario where a value is increased by a certain amount, then multiplied by a factor. For example, a worksheet might state: “Sarah earned $10 per hour plus a $20 bonus. If she earned $80, how many hours did she work?”

Solving requires first subtracting the bonus from the total earnings, then dividing the result by the hourly rate. Worksheets often include variations, like calculating the total cost of items with a fixed price plus a sales tax.

Students must carefully identify the initial amount, the additive constant, and the multiplicative factor to correctly formulate and solve the two-step equation. Practice with these types builds a strong foundation for more complex algebraic concepts.

Problems Involving Subtraction and Division

These word problems often describe a situation where a quantity is reduced by a certain amount, and then the result is divided into equal parts. A typical example might read: “A baker made 50 cookies and sold 12. He then divided the remaining cookies equally among 6 friends. How many cookies did each friend receive?”

The solution involves first subtracting the sold cookies from the initial amount, then dividing the difference by the number of friends. Worksheets frequently present scenarios involving sharing costs or distributing items after a deduction.

Successfully tackling these requires recognizing the initial quantity, the subtracted value, and the divisor to construct the correct equation.

Problems with Fractions and Decimals

These problems introduce an added layer of complexity, requiring students to manipulate fractional or decimal values within the two-step equation. An example could be: “Sarah bought a book for $12.50 and a pen. She paid with a $20 bill and received $2.75 in change. What was the cost of the pen?”

Solving these necessitates a solid understanding of decimal operations or fraction arithmetic. Worksheets often include scenarios involving portions of a whole, discounts expressed as decimals, or quantities measured in fractions.

Careful attention to place value and proper conversion between fractions and decimals is crucial for accurate solutions.

Resources: Two-Step Equations Worksheet PDFs

Numerous free, printable PDFs are available online, offering diverse practice with answer keys. These worksheets cater to different skill levels and learning preferences.

Free Printable Worksheets with Answer Keys

Accessing free, printable worksheets is a fantastic way to reinforce learning and build confidence in solving two-step equation word problems. Many websites offer downloadable PDFs specifically designed for this purpose, often including a comprehensive answer key for self-assessment and immediate feedback.

These resources typically present a variety of real-world scenarios requiring students to translate words into algebraic equations and then solve for the unknown variable. Worksheets often start with simpler problems and gradually increase in complexity, introducing fractions, decimals, or more challenging contextual situations.

The inclusion of answer keys is invaluable, allowing students to check their work, identify areas where they struggle, and understand the correct solution process. This independent practice fosters a deeper understanding of the concepts and prepares students for more advanced mathematical challenges. Look for worksheets from reputable educational sources like Kuta Software LLC for quality content.

Worksheets with Varying Difficulty Levels

Catering to diverse learning needs is crucial, and worksheets designed with varying difficulty levels are essential for effective practice. Beginners benefit from simpler problems with whole numbers and straightforward wording, building a foundational understanding of the process.

As students progress, worksheets should introduce more complex scenarios involving fractions, decimals, and multi-step operations. Some resources, like task cards, even offer differentiated levels – perhaps three distinct tiers – to accommodate all learners within a classroom. This allows students to work at their own pace and challenge themselves appropriately.

Progressing through these levels builds confidence and mastery. Worksheets should gradually increase the abstractness of the problems, moving beyond simple scenarios to more nuanced real-world applications. This ensures a comprehensive grasp of solving two-step equation word problems.

Task Card Options for Interactive Practice

Task cards offer a dynamic alternative to traditional worksheets, fostering engaging and interactive practice with two-step equation word problems. These smaller, focused cards present individual problems, allowing for flexible use – whole-class activities, small group work, or independent practice stations.

Many task card sets include multiple levels of difficulty, catering to diverse student needs. Some resources provide 24 questions across different levels, ensuring all learners are appropriately challenged. This format encourages student movement and collaboration, breaking up the monotony of standard worksheets.

Task cards are easily adaptable for games and activities, like “scoot” or partner work, further enhancing engagement. They promote repeated exposure to problem-solving strategies, solidifying understanding and building fluency in solving two-step equations.

Answer Key Analysis & Common Mistakes

Detailed answer keys, like those provided with worksheets, reveal solution steps. Identifying frequent errors – such as incorrect operation order – helps students improve.

Reviewing Sample Answers (1-10)

Let’s examine solutions to the first ten problems commonly found on two-step equation worksheets. For example, problem 1 often yields an answer of 6, while problem 2 frequently resolves to 30. Problem 3 typically results in 41, and problem 4 often simplifies to 4. Continuing, problem 5 usually equates to 61, and problem 6 often provides a solution of 55.

Problems 7 and 8 frequently have answers of 50 and 10 respectively. Solutions to problems 9 and 10 often are 9 and 97.2. These answers demonstrate the application of inverse operations – addition/subtraction and multiplication/division – to isolate the variable and arrive at the correct value. Careful attention to each step is crucial for accuracy.

Identifying Frequent Errors Students Make

A common mistake involves incorrectly applying the order of operations. Students sometimes add or subtract before multiplying or dividing, leading to inaccurate results. Another frequent error is failing to perform the same operation on both sides of the equation, disrupting the balance. Misinterpreting word cues – like confusing “less than” with “more than” – also leads to incorrect equation setup.

Additionally, students often struggle with negative numbers, particularly when dealing with subtraction. Forgetting to distribute when necessary, or making sign errors during simplification, are also prevalent. Careless arithmetic, such as miscalculating products or quotients, contributes to errors. Thoroughly checking each step is vital to avoid these pitfalls.

Tips for Avoiding Common Mistakes

To minimize errors, always read the word problem carefully multiple times, highlighting key information and identifying the unknown variable. Before solving, rewrite the problem in your own words to ensure full comprehension. Systematically apply the order of operations (PEMDAS/BODMAS) and consistently perform the same operation on both sides of the equation.

Double-check all arithmetic calculations, paying close attention to negative signs. Substitute your solution back into the original equation to verify its accuracy. Practice translating word phrases into mathematical expressions to improve equation setup. Utilize available answer keys as a learning tool, analyzing mistakes to understand the correct approach.

range tribune he user manual

The Range Tribune HE unvented cylinder, crafted from Duplex Stainless Steel, offers superior corrosion resistance․ This manual details installation, maintenance, and safe operation procedures․

Overview of the Range Tribune HE Unvented Cylinder

The Range Tribune HE represents a significant advancement in unvented hot water cylinder technology․ Constructed with Duplex Stainless Steel, it’s designed for exceptional durability and corrosion resistance․ This cylinder provides efficient and reliable hot water storage for domestic and commercial applications, adhering to stringent safety standards․

Duplex Stainless Steel Construction & Corrosion Resistance

Utilizing Duplex Stainless Steel, the Range Tribune HE exhibits remarkable strength and resistance to pitting, crevice corrosion, and stress cracking․ This superior material choice ensures a prolonged lifespan, even in challenging water conditions, minimizing maintenance and maximizing the cylinder’s operational reliability over time․

Storage, Handling & Supply Requirements

Proper storage and handling are crucial before installation․ Ensure the cylinder is protected from damage and supplied with appropriate lifting equipment for safe maneuvering․

Safe Storage Practices

Prior to installation, store the Range Tribune HE cylinder indoors, in a dry and clean environment․ Protect it from physical damage, direct sunlight, and extreme temperatures․ Ensure adequate ventilation around the unit․ Keep packaging intact until ready for use, and avoid stacking other items on top to prevent potential dents or scratches․

Handling Precautions

When handling the Range Tribune HE, use appropriate lifting equipment and trained personnel․ Avoid dragging or dropping the cylinder, as this could cause damage․ Securely fasten the unit during transport to prevent movement․ Inspect for any signs of damage before and after moving it, and report any issues immediately․

Component Table

This section details all identifiable parts of the Range Tribune HE cylinder, including specifications and a comprehensive parts list for easy reference and maintenance․

Identifying Cylinder Components

Understanding each component is crucial for proper installation and servicing․ Key parts include the cylinder casing, duplex stainless steel tank, immersion heater(s), expansion vessel connection point, safety valve location, and solar coil (if applicable)․ Diagrams clearly illustrate each component’s position, aiding in identification during maintenance or troubleshooting procedures, ensuring correct part replacement․

Parts List & Specifications

A comprehensive list details all replaceable parts, including their Kingspan part numbers for easy ordering․ Specifications cover dimensions, capacities (from 60 to 210 liters), maximum working pressure, and temperature ratings․ This section provides vital data for selecting the correct components and verifying system compatibility during servicing or repairs․

Siting the Unit

Proper location is crucial; ensure adequate space for access, servicing, and compliance with local regulations regarding ventilation and discharge pipe routing․

Location Considerations

Select a location that minimizes pipe runs to the primary heat source and distribution points, optimizing efficiency․ The cylinder requires a well-ventilated space, protected from freezing temperatures and direct sunlight․ Ensure the floor is capable of supporting the cylinder’s full operating weight, including water capacity․ Accessibility for servicing is paramount․

Space Requirements & Accessibility

Adequate space around the cylinder is crucial for installation, maintenance, and future servicing․ Allow sufficient clearance for access to all components, including the expansion vessel and safety valve․ Ensure unobstructed access for removal or replacement if necessary, adhering to local regulations and guidelines․

General Installation

Prior to installation, thoroughly inspect the cylinder for any damage․ Ensure correct mounting and secure fixing to a suitable, load-bearing structure, following guidelines․

Pre-Installation Checks

Before commencing installation, verify the suitability of the existing water supply and ensure it meets required pressure and flow rates․ Confirm the structural integrity of the chosen location, capable of supporting the cylinder’s weight when full․ Inspect all components for transit damage, and check compatibility with existing plumbing and electrical systems․

Mounting & Securing the Cylinder

Position the cylinder on a level, stable surface capable of bearing its full weight․ Utilize appropriate lifting equipment adhering to safety guidelines․ Securely fasten the cylinder to the floor or wall using suitable fixings, ensuring stability and preventing movement․ Verify fixings are compatible with the building’s structure․

Discharge Arrangement

Proper discharge includes connecting an expansion vessel and installing a safety valve with a discharge pipe, adhering to regulations for safe operation․

Expansion Vessel Connection

Connecting the expansion vessel is crucial for accommodating water volume changes due to temperature fluctuations within the unvented system․ Ensure the vessel is sized correctly, pre-charged to the appropriate pressure, and securely connected to the cylinder’s designated port․ This prevents over-pressurization and maintains system integrity, safeguarding against potential failures․

Safety Valve & Discharge Pipe Installation

Proper installation of the safety valve and discharge pipe is paramount for system safety․ The valve must be directly connected to the cylinder and the discharge pipe routed to a safe outlet, terminating visibly․ Avoid restrictions or bends, ensuring adequate capacity to handle potential discharge volumes, preventing scalding hazards․

Technical Specifications: Slimline ⏤ Direct & Indirect

Slimline models, both direct and indirect, offer varied capacities and dimensions․ Detailed specifications, including performance data, are crucial for correct system design and installation․

Slimline Direct Model Specifications

Direct models provide instantaneous hot water via direct heating․ Capacity ranges typically span from 120 to 210 liters, with corresponding dimensions varying based on size․ Key specifications include maximum working pressure, heat input, and recovery rates․ These units are designed for efficient and reliable domestic hot water supply, ensuring consistent performance․

Slimline Indirect Model Specifications

Indirect models utilize an external heat source, like a boiler, for efficient water heating․ Capacities range from 120 to 210 liters, with dimensions adjusted accordingly․ Specifications detail coil capacity, maximum working pressure, and heat transfer rates․ These models offer enhanced efficiency and are ideal for central heating systems․

Technical Specifications: Direct

Direct models heat water directly via an immersed electric element․ Capacity and dimensions vary, offering performance data including recovery times and power input ratings․

Direct Model Capacity & Dimensions

Direct models are available in a range of capacities, typically from 120 to 210 liters, catering to diverse hot water demands․ Cylinder dimensions vary accordingly; height ranges approximately from 1345mm to 1620mm, while diameters generally fall between 560mm and 600mm․ Precise measurements are crucial for installation planning․

Direct Model Performance Data

Direct models exhibit impressive recovery times, typically ranging from 25 to 45 minutes depending on the cylinder size and incoming water temperature․ Static heat loss is minimized due to excellent insulation, ensuring efficient energy usage․ Maximum working pressure is 8 bar, providing reliable performance․

Technical Specifications: Indirect

Indirect models utilize primary heat input from a boiler, offering enhanced efficiency and larger capacities for demanding hot water needs within a property․

Indirect Model Capacity & Dimensions

Range Tribune HE indirect cylinders are available in a variety of capacities, ranging from 120 to 300 liters, catering to diverse household demands․ Dimensions vary based on capacity; however, they are designed for compact installation․ Precise height and diameter specifications are detailed within the comprehensive parts list, ensuring appropriate fitting and space allocation during installation․

Indirect Model Performance Data

Range Tribune HE indirect models demonstrate exceptional heat transfer efficiency, maximizing energy utilization from external heat sources․ Recovery times are notably swift, providing ample hot water supply․ Performance data, including heat-up times and standby losses, are clearly outlined in the technical specifications table, aiding optimal system design and performance evaluation․

Technical Specifications: Solar Indirect

Solar Indirect models integrate seamlessly with solar thermal systems, offering enhanced energy efficiency and reduced running costs․ Detailed specifications follow․

Solar Indirect Model Features

These cylinders are specifically designed for optimal performance when paired with solar thermal collectors․ They boast a large surface area solar coil for efficient heat transfer, maximizing renewable energy utilization․ The robust duplex stainless steel construction ensures longevity and resistance to corrosion, even with glycol-based solar fluids․

Solar Indirect Model Performance Data

Performance varies based on solar array size and collector efficiency․ Recovery times are significantly reduced when utilizing solar input, offering substantial energy savings․ Data sheets detail heat-up times at various flow rates and ΔT values, ensuring optimal system design and performance verification for installers․

Solar Coil Installation

Proper connection of the solar coil is crucial for efficient heat transfer․ Ensure correct flow direction and secure fittings, integrating seamlessly with the existing system․

Connecting the Solar Coil

Carefully align the solar coil connections with the cylinder ports, utilizing appropriate sealing compounds to prevent leaks․ Ensure the flow and return lines are correctly identified before tightening fittings․ Proper torque settings are vital; over-tightening can damage components․ Verify all connections are secure and thoroughly tested for leaks before commissioning the system, maximizing solar gain․

System Integration

Seamlessly integrate the solar coil into your existing heating system, ensuring compatibility with controllers and pumps․ Proper sizing of the solar array is crucial for optimal performance․ Consider thermal stratification within the cylinder for efficient hot water delivery․ Regular monitoring of system temperatures guarantees effective energy capture and utilization․

Solar High Limit

The solar high limit function safeguards against overheating․ Adjustable settings prevent excessively high water temperatures, ensuring system safety and component longevity․

Function & Settings

The solar high limit protects the system from dangerously high temperatures when solar gain exceeds demand․ It functions by halting solar coil heating when the cylinder reaches a preset temperature․ Settings are adjustable, allowing optimization for varying solar panel sizes and climate conditions․ Proper adjustment prevents scalding and ensures efficient energy use, maximizing solar contribution while maintaining safe hot water delivery․

Troubleshooting Solar High Limit Issues

If the solar high limit frequently activates, check solar panel output and cylinder thermostat settings․ Verify proper sensor placement and functionality․ Insufficient hot water draw can also trigger it; increase usage or lower the limit temperature․ A faulty sensor requires replacement by a qualified technician to restore optimal system performance․

S-Plan Wiring Schematics

S-Plan systems utilize a two-port valve and cylinder thermostat for efficient heating control․ Detailed wiring diagrams illustrate connections for optimal performance and safety․

S-Plan System Overview

The S-Plan system is a popular heating control method employing a fully-featured timer and a two-port valve․ This configuration allows independent control of primary and secondary heating circuits, enhancing efficiency․ A cylinder thermostat regulates water temperature, while the system prioritizes heating based on user settings and demand, ensuring comfortable and economical operation․

Wiring Diagram & Connections

Refer to the detailed schematic for correct S-Plan wiring․ Connect the timer, two-port valve, cylinder thermostat, and pump according to the diagram․ Ensure all connections are secure and comply with current wiring regulations․ Proper earthing is crucial for safety; consult a qualified electrician if unsure about any aspect of the installation․

Y-Plan Wiring Schematics

Y-Plan systems utilize a three-port valve for heating zone control․ Detailed wiring diagrams illustrate connections for the cylinder, pump, and heating system components․

Y-Plan System Overview

Y-Plan systems are a common central heating configuration employing a three-port valve to direct flow either to the heating circuit or the hot water cylinder․ This setup allows for simultaneous heating and hot water, or prioritizes one over the other based on demand․ The system requires a two-wire thermostat controlling the pump and valve, offering efficient and responsive heating control․

Refer to the detailed wiring diagram provided within this manual for precise Y-Plan connections․ Typically, the thermostat’s live wire connects to the pump’s live, then to the three-port valve․ Ensure correct earth connections and utilize appropriately sized cabling․ Always isolate power before making any connections for safety․

Commissioning & Servicing

Initial commissioning requires thorough system checks, including flow rates and temperature settings․ Routine servicing, performed annually, ensures optimal performance and longevity of the cylinder․

Initial Commissioning Procedures

Before operation, carefully inspect all connections for leaks and ensure proper electrical grounding․ Gradually fill the cylinder with water, monitoring pressure closely․ Verify the correct operation of the safety valve and expansion vessel․ Check temperature settings and adjust as needed, confirming accurate thermostat function․ Document all readings for future reference․

Routine Servicing & Maintenance

Annual servicing is crucial for optimal performance and longevity․ Inspect the safety valve, expansion vessel, and all pipework for corrosion or leaks․ Flush the cylinder to remove sediment buildup․ Check and record water pressure and temperature settings․ A qualified technician should perform these tasks to ensure safety․

Fault Finding & User Instructions

This section details common issues, troubleshooting steps, and essential user safety guidelines for the Range Tribune HE cylinder’s proper and secure operation․

Common Faults & Solutions

Potential issues include low hot water pressure, often due to scale buildup or valve restrictions; investigate and flush the system․ No hot water may indicate a heating source failure or thermostat problem – check connections and settings․ Leaks require immediate attention; isolate the cylinder and contact a qualified engineer for repair or replacement․

User Safety Instructions & Operation

Always ensure the cylinder is installed by a qualified professional, adhering to local regulations․ Never tamper with safety devices like the temperature relief valve․ Regularly check for leaks․ Do not exceed the maximum working pressure․ Familiarize yourself with emergency shutdown procedures for safe and efficient operation․

worcester greenstar 25si user manual

Worcester Greenstar 25Si User Manual: A Comprehensive Guide

This manual provides detailed instructions for operating and maintaining your Worcester Greenstar 25Si boiler, ensuring efficient heating and hot water provision.

The Worcester Greenstar 25Si is a highly efficient, combi boiler designed to provide both central heating and domestic hot water for homes. This user manual serves as a comprehensive guide to understanding, operating, and maintaining your new boiler safely and effectively. It details everything from initial setup and daily operation to troubleshooting common issues and scheduling essential servicing.

Understanding this manual is crucial for maximizing the boiler’s performance and longevity, while also ensuring the safety of your household. The 25Si model is known for its reliability and user-friendly features, making it a popular choice for homeowners seeking a dependable heating solution.

Safety Information & Warnings

This boiler operates using high temperatures and pressures; therefore, strict adherence to safety guidelines is paramount. Never attempt to repair or modify the boiler yourself – always contact a qualified, Gas Safe registered engineer for servicing or repairs. Ensure adequate ventilation in the boiler room and never obstruct the flue.

Be aware of the risks of carbon monoxide poisoning (detailed further in the next section). Regularly check for any signs of leaks or damage. Keep flammable materials away from the boiler and follow all warnings outlined in this manual to prevent accidents and ensure safe operation.

General Safety Precautions

Always supervise children and vulnerable individuals around the boiler, ensuring they understand the potential hazards. Do not use the boiler for any purpose other than its intended use – heating and hot water. Regularly inspect the boiler casing for damage and report any concerns to a qualified engineer.

Ensure the boiler room is kept clean and free from obstructions. Never store flammable liquids or materials nearby. Familiarize yourself with the location of the gas and electricity shut-off valves in case of emergency. Prioritize safety and follow all instructions carefully.

Carbon Monoxide Awareness

Carbon Monoxide (CO) is a colorless, odorless, and deadly gas produced by incomplete combustion. A properly installed and maintained boiler minimizes CO risk, but vigilance is crucial. Install a certified CO detector near the boiler and in living areas, testing it regularly.

Recognize the symptoms of CO poisoning: headache, dizziness, nausea, fatigue, and confusion. If you suspect CO poisoning, immediately evacuate the premises and call emergency services. Never ignore potential warning signs. Ensure adequate ventilation and annual servicing.

System Components & Overview

The Worcester Greenstar 25Si heating system comprises several key components working in harmony. These include the boiler unit itself, the circulating pump, expansion vessel, automatic air vent, and a system filter. Radiators or underfloor heating distribute warmth throughout your home. A thermostat controls the system temperature, while the flue system safely expels combustion gases.

Understanding these components is vital for effective operation and maintenance. Proper functioning ensures efficient heating and hot water delivery. Regular checks and servicing are essential for longevity.

Boiler Unit Breakdown

The Worcester Greenstar 25Si boiler unit houses critical components. These include the heat exchanger, burner assembly, fan, gas valve, and printed circuit board (PCB). The heat exchanger transfers heat from combustion to the water. The burner ignites the gas, while the fan provides combustion air.

The gas valve regulates gas flow, and the PCB controls all boiler functions; A casing encloses these parts for safety and insulation. Understanding each component aids in troubleshooting and maintenance, ensuring optimal performance and longevity of your heating system.

Control Panel & Display

The Greenstar 25Si features a user-friendly control panel with a digital display. This interface allows for easy operation and monitoring of the boiler’s status. Buttons enable temperature adjustment, mode selection (heating, hot water, off), and access to system information. The display shows current temperature settings, error codes, and operational status.

Navigating the menu system provides access to advanced settings and diagnostics. Understanding the display icons is crucial for interpreting boiler performance and identifying potential issues. A clear and responsive control panel enhances user experience.

Initial Setup & Commissioning

Proper initial setup is vital for optimal performance of your Greenstar 25Si boiler. This phase involves several key steps to ensure safe and efficient operation. Firstly, filling the system with water is crucial to establish correct pressure. Secondly, bleeding the radiators removes trapped air, maximizing heating efficiency.

A qualified Gas Safe engineer should perform commissioning, verifying gas supply, flue integrity, and overall system functionality. Correct pressure settings are essential for reliable operation. Following these steps guarantees a smooth start-up and long-term performance.

Filling the System with Water

Before initial start-up, or after system draining, filling with water is essential. Locate the filling loop – typically near the boiler. Close all radiator valves except one, positioned at the highest point. Slowly open the filling loop valves to allow water into the system, monitoring the pressure gauge on the boiler.

The ideal pressure is usually between 1 and 1.5 bar (check your boiler’s display). Once the correct pressure is reached, close the filling loop valves. Open all radiator valves and re-check the pressure. Repeat if necessary.

Bleeding the Radiators

If radiators are cold at the top, air may be trapped inside. You’ll need a radiator key. Turn off the heating system and allow radiators to cool. Place a cloth under the bleed valve to catch any water. Slowly insert the key and turn it counter-clockwise until air hisses out.

Once water appears, tighten the valve to prevent leaks. Repeat for all cold radiators, starting with the highest. After bleeding, check the boiler pressure and top up if needed using the filling loop.

Operating the Greenstar 25Si

The Greenstar 25Si is designed for user-friendly operation. To power on, ensure the gas supply is active and the boiler has power. Press the power button on the control panel; the display will illuminate. For initial heating, select a desired temperature using the up/down buttons.

The boiler will automatically ignite and begin heating the system. Monitor the display for operational status. To power off, press the power button again, allowing a safe shutdown sequence.

Powering On/Off the Boiler

To initiate operation, verify the gas supply is open and the boiler receives power. Press the central power button located on the control panel. The display will activate, indicating the boiler is starting its self-check sequence. Allow a few moments for the system to fully engage before adjusting settings.

For shutdown, press the same power button again. The boiler will undergo a controlled shutdown process, ensuring safe operation. Do not interrupt this process by switching off the power supply directly.

Setting the Temperature

To adjust the heating temperature, use the up and down arrow buttons on the control panel. The current setpoint is displayed prominently. Increment or decrement the temperature in one-degree Celsius steps. Consider your comfort level and energy efficiency when selecting a temperature.

For hot water temperature control, navigate to the hot water setting within the menu. Adjust the desired temperature similarly using the arrow buttons. Be cautious with high temperatures to prevent scalding. Remember to save your changes!

Understanding the Control Panel

The Worcester Greenstar 25Si’s control panel is your central hub for boiler operation. It features a digital display and intuitive button controls. Familiarize yourself with the layout – up/down arrows adjust temperature, the ‘i’ button accesses information, and the central dial navigates menus.

The display shows current temperature settings, error codes, and system status; Pressing the ‘Menu’ button allows access to advanced settings like hot water timers and frost protection. Understanding these functions ensures optimal performance and efficient energy use.

Display Icons & Their Meanings

The Greenstar 25Si utilizes several icons on its display to communicate system status. A flame icon indicates the boiler is actively heating, while a snowflake signifies frost protection is engaged. A tap icon represents hot water demand, and a wrench signals a service reminder.

Error codes are displayed as alphanumeric combinations, requiring reference to the troubleshooting section. A central heating symbol shows the system is active, and a low-pressure warning appears as a droplet icon. Understanding these visual cues allows for quick identification of system needs.

Navigating the Menu System

Accessing the menu on your Greenstar 25Si is achieved by pressing the ‘Menu’ button on the control panel. Use the up and down arrow keys to scroll through the available options, such as temperature settings, time adjustments, and service intervals.

Confirm your selection with the ‘Enter’ button. To exit the menu at any time, press the ‘Back’ button. Familiarize yourself with this process to customize boiler functions. Remember to save any changes before exiting, ensuring optimal performance and user preference settings are maintained.

Hot Water Control

The Greenstar 25Si offers precise hot water control, allowing you to adjust the temperature to your preference. Utilize the control panel to set the desired hot water temperature, ensuring comfortable bathing and washing experiences. Consider energy efficiency by setting a reasonable temperature, reducing unnecessary heating.

The hot water diverter valve manages the flow between heating and hot water. Understanding its function is key to optimizing system performance. Regularly check the valve for smooth operation, ensuring consistent hot water delivery throughout your home.

Adjusting Hot Water Temperature

To adjust the hot water temperature on your Greenstar 25Si, access the hot water setting via the control panel’s menu system. Navigate using the up and down arrows to select your preferred temperature, typically ranging from 35°C to 60°C. Consider safety; lower temperatures reduce scalding risks, especially for vulnerable individuals.

Higher temperatures provide more immediate hot water, but increase energy consumption. Experiment to find a balance between comfort and efficiency. Remember to allow time for the new temperature to take effect before testing the water at your taps.

Using the Hot Water Diverter Valve

The hot water diverter valve manages the flow of hot water between your taps and central heating system. During heating demand, the valve prioritizes radiators; when a tap is opened, it diverts hot water accordingly. Ensure the valve is functioning correctly for optimal performance.

A faulty diverter valve can cause lukewarm water or insufficient heating. If issues arise, consult a qualified engineer for inspection and potential replacement. Regular servicing includes checking the diverter valve’s operation, ensuring smooth transitions and efficient hot water delivery.

Frost Protection & Winter Mode

The Greenstar 25Si features automatic frost protection, activating when the system temperature drops below 5°C. This prevents frozen pipes and potential damage by circulating pump activity. Winter mode enhances this protection, maintaining a higher minimum temperature.

Activate winter mode before prolonged cold spells to ensure reliable operation. Regularly check for pipe insulation, especially in exposed areas. If a power outage occurs during freezing conditions, drain the system to prevent damage. Proper preparation safeguards your heating system throughout winter.

Fault Finding & Troubleshooting

The Greenstar 25Si displays error codes to indicate system faults. Consult the error code list in this manual for specific solutions. Common issues include low water pressure, ignition failures, and blocked flue pathways. Attempt a boiler reset as a first step for minor errors.

If problems persist, do not attempt complex repairs yourself. Contact a qualified heating engineer for assistance. Ignoring faults can lead to further damage and safety hazards. Regular maintenance minimizes the risk of breakdowns and ensures optimal performance.

Common Error Codes & Solutions

Error code E16 indicates low water pressure; check system pressure and re-pressurize if needed; Code G13 suggests ignition failure – verify gas supply and attempt a reset. A blocked flue often triggers code C6, requiring professional inspection. Error F29 points to a flame sensing issue, needing engineer attention.

Code B06 signals a PCB fault, demanding replacement by a qualified technician. Always note the full error code before contacting support. Refer to the full error code list in the appendix for comprehensive details and potential fixes.

Resetting the Boiler

To reset your Greenstar 25Si, first ensure the boiler has cooled down completely. Turn off the power to the boiler at the mains electrical supply. Wait for at least thirty seconds before switching the power back on. This allows the system to fully clear its memory.

If the error persists after a reset, do not repeatedly attempt the process. Contact a qualified Worcester Bosch engineer for assistance. Frequent resets may indicate a more serious underlying issue requiring professional diagnosis and repair.

Regular Maintenance & Servicing

To ensure optimal performance and longevity of your Greenstar 25Si, regular maintenance is crucial. Annual servicing by a qualified Gas Safe registered engineer is highly recommended. This service includes a thorough inspection of all components, cleaning, and safety checks. Neglecting servicing can lead to reduced efficiency, increased fuel bills, and potential breakdowns.

Keep records of all servicing carried out. Regular maintenance also helps maintain the validity of your boiler’s warranty. Proactive care prevents costly repairs down the line.

Annual Servicing Requirements

A qualified Gas Safe registered engineer should perform annual servicing. This includes a visual inspection for corrosion, checking flue gases for safe operation, and testing the boiler’s safety devices. The engineer will clean the burner and heat exchanger, ensuring efficient combustion. They’ll also examine the controls and wiring, verifying correct functionality.

Pressure checks and component testing are vital. Documentation of the service, including gas safety certificate, is essential. Servicing confirms compliance with safety regulations and maintains warranty validity.

Cleaning the Boiler Casing

Before cleaning, always disconnect the boiler from the power supply to prevent electrical shock. Use a soft, damp cloth with mild detergent to wipe down the exterior casing. Avoid abrasive cleaners or scouring pads, as these can damage the finish. Do not spray water directly onto the boiler; dampen the cloth instead.

Ensure the area around the boiler is well-ventilated during cleaning. Pay attention to dust accumulation around vents and controls. Regular cleaning maintains appearance and prevents potential corrosion.

Descaling the Heat Exchanger

Over time, limescale can build up within the heat exchanger, reducing boiler efficiency and potentially causing damage. Descaling removes this buildup, restoring optimal performance. This process typically requires a specialized descaling solution, available from plumbing suppliers. Always follow the manufacturer’s instructions carefully when using descaling chemicals.

It’s recommended to have a qualified engineer perform the descaling procedure, as incorrect handling can void the warranty. Regular descaling – typically every one to two years – prolongs the boiler’s lifespan and maintains efficiency.

Boiler Efficiency & Energy Saving Tips

Maximizing the efficiency of your Greenstar 25Si reduces energy consumption and lowers heating bills. Ensure radiators aren’t blocked by furniture, allowing heat to circulate freely. Consider installing a room thermostat and programmer for precise temperature control, only heating rooms when needed.

Regularly service your boiler to maintain peak performance. Insulate your home effectively – loft, walls, and pipes – to minimize heat loss. Lowering the flow temperature can also improve efficiency, though it may affect hot water output.

Remote Control Options (if applicable)

The Worcester Greenstar 25Si is compatible with various remote control systems, enhancing convenience and control over your heating. These options include the Bosch Easy Control, offering smart thermostat functionality via a mobile app. Users can adjust temperatures, set schedules, and monitor energy usage remotely.

Other compatible systems may require professional installation. Remote control integration allows for zone heating, optimizing comfort and reducing energy waste. Check the Worcester Bosch website for a complete list of compatible accessories and detailed installation guides.

Warranty Information

Your Worcester Greenstar 25Si boiler is covered by a standard manufacturer’s warranty, typically spanning several years from the date of installation. The specific duration and terms depend on the registration status and installation by a Worcester Bosch accredited installer. Registration within a specified timeframe is crucial to validate the full warranty period.

The warranty covers defects in materials and workmanship. Regular annual servicing by a qualified engineer is a mandatory condition for maintaining warranty validity. Review the complete warranty documentation for exclusions and limitations.

Contacting Worcester Bosch Support

For assistance with your Worcester Greenstar 25Si boiler, Worcester Bosch offers multiple support channels. Their dedicated helpline is available during business hours to address technical queries and provide troubleshooting guidance. Alternatively, you can explore their comprehensive online support portal, featuring FAQs, manuals, and video tutorials.

Registered installers also have access to exclusive support resources. For emergency situations or urgent assistance, a 24/7 emergency breakdown service may be available. Visit the official Worcester Bosch website to find contact details and access the support resources best suited to your needs.

Technical Specifications

The Worcester Greenstar 25Si is a condensing combination boiler with an output rating of 25kW. It features a compact design suitable for smaller homes and offers both central heating and domestic hot water. The boiler operates on natural gas and boasts a high efficiency rating, reducing energy consumption.

Key specifications include dimensions of 700mm (H) x 395mm (W) x 280mm (D) and a weight of approximately 60kg. The flow rate for hot water is 12.5 l/min. It complies with relevant safety standards and regulations, ensuring reliable and safe operation.

Wiring Diagrams (Basic Overview)

The Greenstar 25Si’s wiring involves a 230V AC power supply, connection to the heating system controls (thermostat, timer), and communication wiring for fault diagnostics. A typical setup includes a live, neutral, and earth connection. The boiler’s PCB (Printed Circuit Board) manages these connections.

Wiring for external controls usually utilizes a 2-core cable. Important safety precautions must be observed; always isolate the power supply before working with wiring. Detailed wiring diagrams are located inside the boiler casing and in the full installation guide, crucial for qualified engineers only.

Parts List (Commonly Replaced Parts)

Frequently replaced parts on the Greenstar 25Si include the fan, PCB (Printed Circuit Board), gas valve, and pump. The diaphragm expansion vessel often requires replacement due to pressure loss. Additionally, the diverter valve, responsible for hot water flow, can fail over time.

Replacement of these components should only be undertaken by a qualified and certified Gas Safe registered engineer. Using genuine Worcester Bosch parts is crucial for maintaining boiler efficiency and safety. A comprehensive parts list with part numbers is available from Worcester Bosch’s website or through their support channels.

System Pressure Checks

Maintaining correct system pressure, typically between 1 and 1.5 bar (when cold), is vital for optimal Greenstar 25Si performance. Low pressure can cause boiler lockout, while excessive pressure risks component damage. Regularly check the pressure gauge on the boiler’s front panel.

If the pressure is too low, top up using the filling loop, following the instructions in the ‘Initial Setup’ section. If it’s too high, bleed a radiator to release some water. Persistent pressure fluctuations indicate a potential leak; contact a qualified engineer immediately for inspection and repair.

Understanding the Flue System

The Greenstar 25Si utilizes a flue system to safely expel combustion gases outdoors. It’s crucial this system remains unobstructed for safe and efficient operation. Regularly visually inspect the flue terminal, ensuring it’s free from debris like bird nests or snow.

Never attempt to modify or repair the flue system yourself; this must be done by a qualified, Gas Safe registered engineer. Incorrect installation or damage can lead to carbon monoxide poisoning. Ensure the flue terminal is positioned according to regulations, maintaining appropriate clearances from windows and other openings.

Legal Disclaimer & Compliance

Worcester Bosch Group Ltd. provides this manual for guidance only, and assumes no liability for damages arising from improper installation, use, or maintenance. This boiler must be installed and serviced by a qualified, Gas Safe registered engineer, adhering to all relevant regulations and standards.

Compliance with building regulations and local codes is the responsibility of the installer and user. The information contained herein is subject to change without notice. Refer to the official Worcester Bosch website for the most up-to-date documentation and compliance information.

Frequently Asked Questions (FAQ)

Q: Why is my boiler displaying an error code? A: Error codes indicate specific faults; consult the ‘Fault Finding & Troubleshooting’ section for solutions. Q: How often should the boiler be serviced? A: Annual servicing by a Gas Safe engineer is crucial for efficiency and safety.

Q: Can I adjust the hot water temperature myself? A: Yes, refer to the ‘Hot Water Control’ section for instructions. Q: What does the low-pressure warning mean? A: It indicates insufficient water in the system; re-pressurize as detailed in the manual.

1000 english grammar rules pdf

Numerous resources, like the “400 Golden Rules of English Grammar” PDF, and concise e-books, offer comprehensive guides to mastering the intricacies of the English language.

These materials, often available as free downloads, aim to solidify understanding through detailed explanations and practical examples, aiding both learners and educators.

Effective communication hinges on a firm grasp of these rules, with resources focusing on areas like tense charts and correcting common errors in nouns and pronouns.

What is English Grammar?

English grammar is the systematic set of rules governing the structure of sentences, encompassing morphology (word formation) and syntax (arrangement of words). It dictates how words combine to create meaningful phrases and clauses, ultimately forming coherent communication.

Resources like the “400 Golden Rules of English Grammar” PDF demonstrate this complexity, detailing conventions for nouns, pronouns, and possessives. Understanding grammar isn’t merely about memorizing rules; it’s about internalizing the patterns that native speakers intuitively follow.

These rules, often compiled into extensive guides – some reaching towards the ambitious “1000 English Grammar Rules” – cover everything from basic sentence structure to nuanced aspects of tense and voice. A solid grasp of grammar is fundamental for both accurate writing and effective spoken English, enabling clarity and precision in expression. It’s the framework upon which language proficiency is built, allowing for both comprehension and creative use.

Furthermore, mastering grammar facilitates the avoidance of common errors highlighted in various learning materials.

Why Learn English Grammar Rules?

Learning English grammar rules is paramount for effective communication, enabling both clarity and precision in expression. A strong grammatical foundation, as detailed in resources like comprehensive “1000 English Grammar Rules” guides, minimizes misunderstandings and enhances credibility.

Resources such as the “400 Golden Rules of English Grammar” PDF emphasize correcting common errors, directly improving writing and speaking skills. Mastery of grammar isn’t just academic; it’s practical, impacting professional success, academic performance, and social interactions.

Furthermore, understanding grammatical nuances allows for a deeper appreciation of the language’s structure and artistry. It empowers individuals to not only follow rules but also to creatively manipulate them for stylistic effect. Access to free e-books and online tools facilitates this learning process, making grammatical proficiency attainable for all. Ultimately, it unlocks the full potential of the English language.

Therefore, investing in grammar education is an investment in effective communication.

Fundamental Grammar Concepts

Essential concepts—nouns, pronouns, verbs, adjectives, and adverbs—form the bedrock of English, detailed in extensive guides like the “1000 English Grammar Rules” PDF.

Nouns: Types and Usage

Nouns, representing people, places, things, or ideas, are foundational to sentence construction, and a thorough understanding of their various types is crucial for grammatical accuracy.

Resources like the “400 Golden Rules of English Grammar” PDF and broader “1000 English Grammar Rules” materials categorize nouns into common (general names) and proper (specific names) nouns, requiring capitalization.

Furthermore, nouns can be concrete (tangible) or abstract (intangible concepts), and collective (groups) or countable/uncountable, impacting article usage and verb agreement.

Grammatical number—singular or plural—is a key aspect, often involving regular additions like ‘-s’ or irregular forms detailed in comprehensive grammar guides.

Possessives, formed with apostrophes, indicate ownership and are covered extensively, alongside corrections for common errors involving noun usage and form.

Mastering these distinctions, as outlined in downloadable PDFs, is vital for clear and effective communication in English.

Pronouns: Replacing Nouns Effectively

Pronouns serve as substitutes for nouns, preventing repetition and enhancing sentence flow, and their correct usage is a cornerstone of English grammar, detailed in resources like the “400 Golden Rules” PDF.

These guides categorize pronouns into personal (I, you, he, she, it, we, they), possessive (my, your, his, her, its, our, their), reflexive (myself, yourself), and relative (who, whom, which, that).

Crucially, pronoun-antecedent agreement—ensuring the pronoun matches the noun it replaces in number and gender—is emphasized, alongside proper case usage (subjective, objective, possessive).

Common errors, such as incorrect pronoun references or ambiguous pronoun usage, are addressed in comprehensive grammar materials, including those offering “1000 English Grammar Rules”.

Understanding the nuances of pronoun selection, particularly in complex sentences, is vital for clarity and precision in writing and speech.

Effective pronoun use, as demonstrated in downloadable PDFs, contributes significantly to concise and coherent communication.

Verbs: The Core of Sentence Structure

Verbs are the dynamic heart of any sentence, expressing actions, occurrences, or states of being, and mastering their forms is central to English grammar, as detailed in extensive resources like PDFs containing “1000 English Grammar Rules”.

These materials cover verb tenses – past, present, future – and their various aspects (simple, continuous, perfect, perfect continuous), crucial for conveying time accurately.

Subject-verb agreement, a fundamental principle, dictates that verbs must align with their subjects in number (singular or plural), a point often highlighted in grammar guides.

Auxiliary (helping) verbs, such as ‘be’, ‘have’, and ‘do’, play a vital role in forming different tenses and moods, and are thoroughly explained in downloadable resources.

Understanding irregular verb forms, which don’t follow standard conjugation patterns, is essential, and is often addressed in comprehensive grammar rule sets.

Correct verb usage ensures clarity and precision, forming the backbone of effective communication, as emphasized in numerous grammar PDFs.

Adjectives and Adverbs: Describing and Modifying

Adjectives and adverbs enrich language by providing descriptive detail, and a solid understanding of their function is vital, as covered extensively in resources like “1000 English Grammar Rules” PDFs.

Adjectives modify nouns, adding qualities or characteristics – for example, a beautiful flower – while adverbs modify verbs, adjectives, or other adverbs, indicating manner, time, place, or degree.

Comparative and superlative forms of adjectives (taller, tallest) are crucial for expressing degrees of quality, and are thoroughly explained in grammar guides.

Proper adverb placement is key to clarity; misplacement can alter meaning, a common error addressed in grammar correction materials.

Distinguishing between adjectives and adverbs is essential, as they serve different grammatical roles, a point often clarified in downloadable PDFs.

Mastering these parts of speech allows for more nuanced and expressive writing, enhancing communication effectiveness, as emphasized in comprehensive grammar resources.

Essential Grammar Rules

Comprehensive PDFs, like those detailing “1000 English Grammar Rules”, emphasize subject-verb agreement, correct article usage, and tense mastery for clear communication.

Understanding these fundamentals, alongside conditional sentences and voice, is crucial for grammatical accuracy and effective expression.

Subject-Verb Agreement

Subject-verb agreement, a cornerstone of English grammar detailed in resources like comprehensive “1000 English Grammar Rules” PDFs, dictates that a verb must align in number – singular or plural – with its subject.

This seemingly simple rule can become complex with intervening phrases, compound subjects joined by “and,” or subjects connected by “or/nor.” Singular subjects necessitate singular verbs (e;g., “He writes”), while plural subjects demand plural verbs (e.g., “They write”).

Indefinite pronouns like “each,” “everyone,” and “nobody” are generally singular, even if they seem to imply plurality. Collective nouns (team, family) can be singular or plural depending on whether they act as a unit or as individual members.

Mastering this rule, often reinforced through practice exercises in grammar guides, is vital for constructing grammatically correct and easily understandable sentences, avoiding common errors highlighted in correction-focused PDFs.

Consistent application of subject-verb agreement enhances clarity and professionalism in both written and spoken English.

Correct Use of Articles (A, An, The)

The proper application of articles – ‘a,’ ‘an,’ and ‘the’ – is a frequent stumbling block for English learners, thoroughly addressed in detailed grammar rulebooks and “1000 English Grammar Rules” PDFs.

‘A’ and ‘an’ are indefinite articles used before singular, countable nouns, with ‘an’ preceding vowel sounds (e.g., “an apple”). They introduce nonspecific nouns. ‘The’ is the definite article, specifying a particular noun already known to the reader or listener.

Usage depends on context; use ‘the’ for unique entities (the sun) or when referring to something previously mentioned. Omission of articles is also crucial – generally avoid them before proper nouns or uncountable nouns (e.g., “water”).

Many grammar resources emphasize practice to internalize these nuances, correcting common errors involving unnecessary or missing articles, ultimately improving sentence clarity and precision.

Understanding these distinctions, often reinforced through examples in comprehensive guides, is essential for fluent and accurate English communication.

Tenses: A Comprehensive Overview

English tenses, a cornerstone of grammatical accuracy, are extensively covered in resources like “1000 English Grammar Rules” PDFs, offering a detailed exploration of their formation and usage.

These resources categorize tenses into past, present, and future, each further divided into simple, continuous, perfect, and perfect continuous forms. Mastering these distinctions is vital for conveying time accurately.

Understanding how verbs change to reflect different timeframes – whether an action is completed, ongoing, or will occur – is crucial. Tense charts are frequently included for easy reference.

Correct tense usage avoids ambiguity and ensures clear communication. Resources highlight common errors, such as incorrect shifts in tense within a sentence or paragraph.

Proficiency in tenses, achieved through study and practice, allows for nuanced expression and a deeper understanding of English sentence structure.

Conditional Sentences: Expressing Possibilities

Conditional sentences, vital for expressing hypothetical situations and their consequences, are thoroughly addressed within comprehensive grammar guides like the “1000 English Grammar Rules” PDF.

These sentences typically involve ‘if’ clauses, categorized into zero, first, second, and third conditionals, each representing a different degree of probability.

The zero conditional describes general truths, while the first predicts likely outcomes; Second conditionals discuss unreal or improbable scenarios, and third conditionals explore past impossibilities.

Understanding the correct verb tense combinations within each conditional type is essential for clarity. Resources often provide examples illustrating these structures.

Mastering conditional sentences enhances your ability to articulate possibilities, make predictions, and discuss alternative realities with precision and grammatical correctness.

Active and Passive Voice

The distinction between active and passive voice is a cornerstone of English grammar, meticulously explained in resources like the “1000 English Grammar Rules” PDF.

Active voice emphasizes the actor performing the action (“Ramandeep Singh wrote the notes”), while passive voice focuses on the action itself (“The notes were written by Ramandeep Singh”).

Choosing between the two depends on the desired emphasis; active voice is generally more direct and concise, while passive voice can be useful when the actor is unknown or unimportant.

Grammar guides detail how to transform sentences from active to passive voice, involving changes to verb forms and the potential inclusion of “by + agent”.

Understanding this concept allows for more nuanced and effective writing, enabling you to control the flow and focus of your sentences with greater precision.

Advanced Grammar Topics

Comprehensive PDFs, like those detailing “1000 English Grammar Rules”, delve into complex structures – relative clauses, gerunds, prepositions, and conjunctions – for mastery.

Relative Clauses: Adding Information

Relative clauses are pivotal in constructing complex sentences, providing additional descriptive details about nouns within a sentence, and enhancing clarity for the reader.

Resources like extensive grammar rule PDFs, such as those containing “1000 English Grammar Rules”, dedicate significant sections to mastering these clauses, outlining the proper usage of relative pronouns – who, whom, which, that, whose – and relative adverbs.

Understanding the distinction between defining and non-defining relative clauses is crucial; defining clauses are essential to the sentence’s meaning, while non-defining clauses offer extra, non-essential information, set off by commas.

These PDFs often include numerous examples illustrating correct punctuation and pronoun selection, helping learners avoid common errors and build confidence in their writing. They emphasize how skillfully employed relative clauses can transform simple sentences into nuanced and informative statements.

Furthermore, they cover reduced relative clauses, offering concise alternatives for more fluent and sophisticated prose.

Gerunds and Infinitives: Verb Forms as Nouns

Gerunds and infinitives frequently challenge English language learners, as they function as nouns despite originating from verbs, demanding careful consideration of their correct application.

Comprehensive grammar resources, including extensive “1000 English Grammar Rules” PDFs, dedicate substantial sections to clarifying their usage, detailing which verbs are typically followed by gerunds (verb + -ing) and which by infinitives (to + verb).

These materials highlight that certain verbs can take either form, often with subtle shifts in meaning, and provide illustrative examples to demonstrate these nuances.

The PDFs also address instances where gerunds or infinitives act as subjects, objects, or complements within sentences, reinforcing their noun-like qualities.

Mastering this distinction is vital for constructing grammatically accurate and stylistically refined sentences, and these resources offer detailed explanations and practice exercises to facilitate learning.

Prepositions: Showing Relationships

Prepositions are essential for establishing relationships between nouns or pronouns and other words in a sentence, indicating location, time, direction, or manner – a concept thoroughly covered in detailed grammar guides.

Resources like the “1000 English Grammar Rules” PDF dedicate significant attention to the complexities of prepositions, recognizing that their correct usage is often subtle and context-dependent.

These materials often categorize prepositions (time, place, movement) and provide extensive lists with example sentences illustrating their diverse applications.

The PDFs also address common prepositional phrases and potential errors, such as confusing “in” and “on” for time or location, offering clear explanations and practice exercises.

A strong understanding of prepositions is crucial for precise and effective communication, and these resources aim to equip learners with the knowledge to navigate their intricacies confidently.

Conjunctions: Connecting Words and Phrases

Conjunctions serve as vital connectors, linking words, phrases, and clauses to form coherent sentences – a fundamental aspect detailed within comprehensive grammar resources like the “1000 English Grammar Rules” PDF.

These PDFs categorize conjunctions into coordinating (FANBOYS – for, and, nor, but, or, yet, so) and subordinating types, explaining their distinct functions in sentence structure.

The materials emphasize how coordinating conjunctions create equal connections, while subordinating conjunctions establish dependent relationships, influencing sentence meaning and flow.

Detailed examples illustrate the correct usage of each type, alongside explanations of common errors, such as improper comma placement when using coordinating conjunctions.

Mastering conjunctions is key to building complex and nuanced sentences, and these resources provide the necessary guidance for learners to achieve grammatical accuracy and clarity.

Resources for Learning

Numerous PDFs, like the “1000 English Grammar Rules” guide, offer accessible learning; online checkers and recommended books further enhance understanding and skill development.

Free PDF Downloads of Grammar Rules

A wealth of downloadable PDF resources exists for those seeking to deepen their understanding of English grammar. The “400 Golden Rules of English Grammar” is a frequently cited example, offering corrections for common errors related to nouns, pronouns, and possessives – a solid foundation for improvement.

Furthermore, comprehensive guides aiming for a more exhaustive coverage, such as resources referencing “1000 English Grammar Rules,” are available online, though quality can vary. These PDFs often present rules in a structured format, ideal for self-study and reference.

Many websites compile lists of basic grammar rules, summarized in concise e-books, also offered as free PDFs. These are particularly useful for beginners or those needing a quick refresher. Remember to critically evaluate the source and ensure the information aligns with established grammatical standards before relying solely on these materials.

Exploring different PDFs allows learners to find a style and approach that best suits their learning preferences, ultimately contributing to a more effective and enjoyable grammar learning experience.

Online Grammar Checkers and Tools

While comprehensive PDF guides like those detailing “1000 English Grammar Rules” provide foundational knowledge, online grammar checkers offer immediate, practical assistance. These tools analyze text in real-time, identifying errors in grammar, punctuation, and style.

Numerous free and premium options are available, ranging from basic spellcheckers to sophisticated platforms employing artificial intelligence. These tools can highlight potential issues with subject-verb agreement, article usage, and tense consistency – areas often covered extensively in detailed grammar rulebooks.

However, it’s crucial to remember that these checkers aren’t infallible. They may miss nuanced errors or suggest changes that alter the intended meaning. Therefore, they should be used as supplementary aids, not replacements for a solid understanding of grammatical principles gleaned from resources like PDF guides.

Effectively combining the in-depth knowledge from PDFs with the instant feedback of online tools creates a powerful learning synergy, accelerating grammar proficiency.

Recommended Grammar Books

Alongside digital resources like downloadable “1000 English Grammar Rules” PDFs, traditional grammar books remain invaluable for structured learning. These books often present rules systematically, with detailed explanations and numerous practice exercises.

Many highly-regarded texts focus on core concepts, covering everything from parts of speech and sentence structure to punctuation and style. Some books specifically address common errors, mirroring the corrective focus found in resources detailing grammatical number and possessives.

Choosing a book depends on your learning style and level. Beginners might benefit from introductory guides, while advanced learners may prefer comprehensive references. Look for books with clear explanations, ample examples, and answer keys for self-assessment.

Ultimately, combining the portability of a physical book with the accessibility of PDF guides and online tools provides a well-rounded approach to mastering English grammar.

Common Grammar Mistakes to Avoid

PDF guides, like those detailing “1000 English Grammar Rules”, highlight frequent errors in pronoun usage and misplaced modifiers, crucial for clear communication.

Understanding these pitfalls, often involving nouns and possessives, is key to refining writing and avoiding common grammatical inaccuracies.

Misplaced Modifiers

Misplaced modifiers, a common error addressed in resources like comprehensive “1000 English Grammar Rules” PDFs, occur when a descriptive phrase is positioned incorrectly in a sentence, leading to unintended and often humorous meanings. These guides emphasize the importance of placing modifiers as close as possible to the words they intend to describe.

For example, “Covered in chocolate, I ate the cake” incorrectly suggests I was covered in chocolate, rather than the cake. Correct placement would be “I ate the cake covered in chocolate.”

Such errors can significantly alter the clarity of your writing, making it ambiguous or confusing. Detailed grammar resources often provide numerous examples and exercises to help learners identify and correct misplaced modifiers, improving overall sentence structure and precision. Mastering this aspect of grammar is vital for effective and professional communication.

Paying close attention to word order and the logical relationship between phrases is essential to avoid these common pitfalls.

Incorrect Pronoun Usage

Resources detailing “1000 English Grammar Rules,” often available as downloadable PDFs, consistently highlight incorrect pronoun usage as a frequent error. This encompasses issues like pronoun-antecedent disagreement – where a pronoun doesn’t match the noun it refers to in number or gender. For instance, “Everyone should bring their book” is incorrect; “Everyone should bring his or her book” is preferred, though rephrasing to “All students…” is often clearer.

Another common mistake involves unclear pronoun references. Sentences like “John told Mark he was wrong” leave the reader unsure who “he” refers to.

These guides emphasize the need for clarity and precision in pronoun selection, offering exercises to practice identifying and correcting these errors. Correct pronoun usage is crucial for maintaining a clear and professional tone in both writing and speech, ensuring effective communication and avoiding ambiguity.

Careful review and attention to detail are key to mastering this aspect of grammar.

daniel fast recipes pdf

Daniel Fast Recipes PDF: A Comprehensive Guide

Discover a wealth of Daniel Fast recipes in convenient PDF format‚ offering 21 days of prayerful eating with options for breakfast‚ lunch‚ and dinner!

Understanding the Daniel Fast

The Daniel Fast‚ rooted in the biblical story of Daniel’s devotion (Daniel 1:12)‚ is a spiritual practice involving a plant-based‚ whole-food diet for a defined period. It’s more than just dietary restriction; it’s a focused time of prayer and seeking God’s guidance.

Typically lasting 21 days‚ the fast encourages consuming fruits‚ vegetables‚ whole grains‚ legumes‚ and water. Many utilize Daniel Fast recipes and meal plans‚ often available as free PDF downloads‚ to simplify the process. These resources provide structure and inspiration‚ ensuring nutritional balance during this intentional period of spiritual discipline.

The goal isn’t simply weight loss‚ but rather a deeper connection with faith through mindful eating and focused prayer. PDF guides often include permitted food lists and recipe ideas.

The Biblical Basis of the Daniel Fast

The Daniel Fast finds its origin in the Book of Daniel‚ specifically Daniel 1:8-14. Daniel and his companions refused the king’s rich food‚ opting for a diet of vegetables and water to remain faithful to God’s laws. This act of devotion demonstrated their commitment and ultimately resulted in God granting them favor and wisdom.

While the Bible doesn’t explicitly detail a “Daniel Fast” as we know it today‚ the principle of abstaining from certain foods for spiritual purposes is evident. Modern interpretations‚ aided by Daniel Fast recipes and PDF guides‚ aim to emulate Daniel’s discipline.

These resources often emphasize a plant-based approach‚ mirroring the vegetables Daniel consumed‚ fostering a deeper connection with faith through mindful eating.

Duration and Timing of the Fast

Traditionally‚ the Daniel Fast lasts for 21 days‚ inspired by the biblical account of Daniel’s period of prayer and fasting. However‚ individuals can adapt the duration based on personal conviction and spiritual goals. Shorter fasts‚ like 7 or 10 days‚ are also common‚ utilizing readily available Daniel Fast recipes.

Timing often aligns with the start of a new year‚ a specific season of prayer‚ or a period of significant life transition. Many utilize PDF meal plans to structure their fast effectively.

Regardless of length‚ preparation is key‚ ensuring access to approved foods and helpful Daniel Fast resources.

Permitted Foods on the Daniel Fast

The Daniel Fast centers around a whole-food‚ plant-based diet. Fruits and vegetables form the cornerstone‚ offering diverse options for flavorful Daniel Fast recipes. Legumes – beans‚ lentils – are excellent protein sources‚ frequently featured in PDF recipe collections.

Whole grains like brown rice and quinoa provide sustained energy. Nuts and seeds‚ consumed in moderation‚ add healthy fats. Water is crucial for hydration‚ and herbal teas are permitted.

Many Daniel Fast guides‚ often available as PDF downloads‚ provide detailed food lists and recipe ideas‚ simplifying meal planning during this spiritual practice.

Foods to Avoid During the Daniel Fast

A core principle of the Daniel Fast‚ detailed in many PDF guides‚ is abstaining from certain foods to focus on spiritual discipline. All animal products – meat‚ poultry‚ fish‚ dairy‚ and eggs – are prohibited. Refined sugars‚ artificial sweeteners‚ and processed foods are also excluded from Daniel Fast recipes.

Leavened bread‚ white rice‚ and processed grains are not permitted. Solid fats‚ including oils‚ are generally avoided‚ though some allow small amounts of olive oil. Caffeine‚ alcohol‚ and carbonated beverages are also off-limits.

PDF resources often emphasize a “chemical-free” approach‚ avoiding additives and preservatives.

Daniel Fast Recipe Categories

Daniel Fast recipes PDF guides categorize meals into breakfast‚ lunch‚ dinner‚ and snacks‚ providing diverse‚ plant-based options for a fulfilling 21-day fast.

Breakfast Recipes for the Daniel Fast

Starting your Daniel Fast with a nourishing breakfast is crucial! Many Daniel Fast recipes PDF resources feature options like hearty oatmeal prepared with water or unsweetened almond milk‚ enhanced with fruits like berries or sliced bananas. Consider fruit smoothies blending permitted fruits – avoiding any added sweeteners‚ of course. Whole-grain cereals (check ingredients carefully for prohibited additives!) paired with fruit are also viable choices.

Explore recipes for baked apples with cinnamon‚ or a simple fruit salad. Remember‚ the focus is on whole‚ plant-based foods. PDF guides often include recipes for sprouted grain cereals‚ offering a protein boost. These breakfasts aim to provide sustained energy for prayer and reflection throughout the day‚ adhering strictly to the fast’s guidelines.

Lunch Recipes for the Daniel Fast

Finding satisfying lunch options during the Daniel Fast is easily achievable with the right recipes PDF. Many guides showcase vibrant vegetable soups‚ packed with nutrients and flavor – a cornerstone of the fast. Large salads featuring leafy greens‚ permitted vegetables‚ and beans or lentils provide a filling and healthy meal. Consider wraps using large lettuce leaves instead of tortillas‚ filled with mashed avocado and chopped vegetables.

PDF resources often include recipes for lentil stews or bean-based salads. Remember to avoid processed foods and added oils. Simple combinations like steamed vegetables with a side of quinoa are also excellent choices. These lunches should be light yet sustaining‚ supporting your spiritual focus throughout the afternoon.

Dinner Recipes for the Daniel Fast

Dinner during the Daniel Fast should be nourishing and promote restful sleep‚ and a recipes PDF can be invaluable. Explore options like hearty vegetable stir-fries‚ utilizing permitted vegetables and seasonings. Baked sweet potatoes‚ topped with steamed greens and a sprinkle of herbs‚ offer a comforting meal; Lentil shepherd’s pie‚ using mashed sweet potatoes as the topping‚ is a satisfying alternative to traditional recipes.

PDF guides frequently feature bean-based casseroles or vegetable-packed curries (without coconut milk or prohibited spices). Zucchini noodles with a simple tomato sauce and steamed vegetables are also excellent. Remember to prioritize whole‚ unprocessed foods and avoid added fats or sweeteners for a truly Daniel Fast-compliant dinner.

Snack Recipes for the Daniel Fast

Snacking during the Daniel Fast‚ as detailed in many recipe PDFs‚ should focus on sustaining energy levels between meals with wholesome‚ plant-based options. Fresh fruit – apples‚ bananas‚ berries – are excellent choices‚ providing natural sweetness and vital nutrients. Raw vegetables like carrot sticks‚ celery‚ and cucumber‚ paired with a small amount of hummus (check ingredients for compliance)‚ offer a crunchy and satisfying snack.

PDF resources often include recipes for simple fruit salads or baked apples with cinnamon. A handful of raw nuts and seeds (unsalted and unseasoned) can provide healthy fats and protein. Remember to keep snacks small and mindful‚ avoiding overeating and staying true to the fast’s principles.

Popular Daniel Fast Recipes

Explore widely-loved Daniel Fast recipes‚ often found in PDF guides‚ including vegetable soups‚ bean-based dishes‚ fruit smoothies‚ and versatile zucchini noodles!

Vegetable Soup Recipes

Discover a comforting array of Daniel Fast-approved vegetable soup recipes‚ frequently compiled in downloadable PDF guides. These nourishing soups emphasize whole‚ plant-based ingredients‚ perfectly aligning with the fast’s principles. Many PDF resources showcase variations featuring seasonal vegetables like butternut squash‚ carrots‚ and spinach.

Explore recipes highlighting simple broths‚ seasoned with herbs and spices – avoiding any added sugars or refined ingredients. You’ll find options ranging from hearty minestrone-style soups to lighter‚ broth-based cleanses. PDF collections often include detailed instructions and nutritional information‚ making meal planning easier. These soups are a staple‚ providing hydration and essential nutrients throughout the 21-day fast‚ readily available in convenient PDF formats.

Bean and Lentil Based Recipes

Daniel Fast PDF resources frequently feature robust bean and lentil-based recipes‚ providing essential protein and fiber during the fast. These plant-powered dishes are central to many meal plans‚ offering satisfying and nutritious options. You’ll find PDF guides detailing lentil soups‚ bean stews‚ and even bean-based “meatballs” utilizing permitted seasonings.

Explore recipes incorporating red lentils‚ black beans‚ and chickpeas‚ all compliant with the fast’s guidelines. Many PDF collections emphasize simple preparation methods‚ focusing on whole food ingredients and avoiding processed components. These recipes are often highlighted for their versatility and ability to be incorporated into various meals. Downloadable PDFs often include serving suggestions and modifications for dietary preferences‚ making them a valuable resource.

Fruit Smoothie Recipes

Daniel Fast PDF guides often include a delightful array of fruit smoothie recipes‚ offering a quick and refreshing way to nourish your body during the fast. These smoothies typically feature permitted fruits like berries‚ bananas‚ and apples‚ blended with water or unsweetened almond milk. Many PDF resources emphasize the importance of avoiding added sugars or artificial sweeteners‚ sticking to the natural sweetness of the fruit.

Discover recipes incorporating ingredients like dates for a touch of natural sweetness and spices like cinnamon for added flavor. Downloadable PDFs frequently provide variations to suit different tastes and nutritional needs. These smoothie recipes are often presented as ideal breakfast or snack options‚ providing a convenient and healthy boost of energy throughout the day‚ aligning with the fast’s principles.

Zucchini Noodle (Zoodle) Recipes

Daniel Fast PDF resources increasingly feature creative recipes utilizing zucchini noodles‚ or “zoodles‚” as a healthy and satisfying alternative to traditional pasta. These recipes align perfectly with the fast’s emphasis on whole‚ plant-based foods‚ offering a low-carb and nutrient-rich option. Downloadable guides showcase various zoodle preparations‚ often paired with permitted vegetables and plant-based sauces.

Many PDFs highlight simple sauce options made from blended tomatoes‚ herbs‚ and spices‚ avoiding any processed ingredients or added sugars. Zoodle recipes are frequently presented as excellent dinner options‚ providing a filling and flavorful meal that adheres to the Daniel Fast guidelines. Explore diverse PDFs for inspiration and enjoy this versatile ingredient during your fast!

Resources for Daniel Fast Recipes

Find numerous Daniel Fast recipes PDF downloads‚ printable food lists‚ helpful websites‚ and dedicated cookbooks to support your 21-day journey!

Free Printable Daniel Fast Food List

Accessing a free printable Daniel Fast food list is crucial for simplifying your preparation and ensuring adherence to the dietary guidelines. These lists‚ often available as PDF documents‚ clearly outline permitted and restricted foods‚ eliminating guesswork during meal planning and grocery shopping.

Typically‚ permitted foods include all fruits and vegetables‚ whole grains‚ legumes (beans‚ lentils)‚ nuts‚ and seeds. Water is the primary beverage‚ alongside unsweetened herbal teas. Conversely‚ the list will explicitly exclude all animal products‚ sweeteners (including natural ones like honey or maple syrup)‚ leavened bread‚ refined sugars‚ processed foods‚ and caffeine.

Many websites dedicated to the Daniel Fast offer downloadable lists‚ providing a convenient and organized resource. Utilizing a printed list keeps you focused and supports a successful fast!

Daniel Fast Meal Plan PDF Downloads

Streamline your Daniel Fast experience with readily available PDF meal plans! These downloadable resources provide a structured approach‚ offering daily breakfast‚ lunch‚ and dinner ideas aligned with the fast’s restrictions. Many plans span the full 21 days‚ removing the stress of daily meal creation.

PDF meal plans often include detailed recipes‚ grocery lists‚ and helpful tips for success. They cater to various preferences‚ from simple and quick options to more elaborate culinary creations. Searching online reveals numerous free and premium plans‚ allowing you to choose one that suits your lifestyle and cooking skills.

Downloading a PDF ensures easy access‚ even without an internet connection‚ making it a practical tool throughout your fast. Embrace the convenience and focus on spiritual growth!

Websites with Daniel Fast Recipes

Numerous websites dedicate themselves to providing Daniel Fast recipes‚ offering a diverse range of plant-based‚ whole-food options. Danielfastjourney.com is a prominent resource‚ featuring a 7-day plan and numerous recipes accessible online. Explore these sites for inspiration and meal ideas!

Many food blogs and health-focused websites also host Daniel Fast-friendly content. Searching “Daniel Fast recipes” yields countless results‚ including options for breakfast‚ lunch‚ dinner‚ and snacks. These platforms often include user reviews and helpful cooking tips.

Remember to verify that recipes adhere strictly to the Daniel Fast guidelines – avoiding leavening‚ sweeteners‚ and processed foods. Utilize these websites to discover new flavors and simplify your fasting journey!

Daniel Fast Cookbooks Available

Several cookbooks specifically cater to the Daniel Fast‚ offering curated collections of compliant recipes. These resources provide a structured approach to meal planning and often include helpful guidance on the fast’s principles. Look for titles focused on whole-food‚ plant-based diets aligned with the Daniel Fast guidelines.

Cookbooks can be particularly useful for those who prefer a tangible resource or enjoy browsing recipes offline. They frequently feature beautiful photography and detailed instructions‚ making the cooking process more enjoyable.

Consider exploring options available on online retailers and in bookstores. Many cookbooks also offer PDF versions for convenient digital access‚ aligning with the search for Daniel Fast recipes PDF options!

Tips for Success on the Daniel Fast

Planning is key! Utilize Daniel Fast recipes PDF resources to prepare meals in advance‚ ensuring adherence and minimizing stress during your fast.

Preparing for the Fast

Embarking on a Daniel Fast requires thoughtful preparation‚ and utilizing Daniel Fast recipes PDF guides is an excellent starting point. Begin by thoroughly reviewing permitted and restricted foods‚ ensuring a clear understanding of dietary guidelines. Download and print a comprehensive food list for easy reference during grocery shopping.

Next‚ dedicate time to gather a collection of appealing recipes – PDFs offer convenient organization. Plan your meals for the first week‚ focusing on simplicity and flavor. Stock your pantry with staples like beans‚ lentils‚ whole grains‚ and fresh produce. Consider prepping ingredients in advance‚ such as chopping vegetables or cooking beans‚ to save time during the fast.

Finally‚ mentally and spiritually prepare yourself for the journey. Set clear intentions for your fast‚ focusing on prayer and spiritual growth. Remove tempting foods from your environment to minimize cravings and distractions. A well-prepared approach significantly increases your chances of a successful and rewarding fast!

Staying Hydrated During the Fast

Maintaining adequate hydration is crucial during the Daniel Fast‚ and Daniel Fast recipes PDF resources often emphasize this. Water is your primary beverage; aim for at least eight glasses daily‚ increasing intake with activity. Herbal teas‚ unsweetened‚ are also permitted and can add variety.

Focus on incorporating water-rich foods into your meals‚ complementing your recipes. Fruits like watermelon and berries‚ and vegetables such as cucumbers and celery‚ contribute to your fluid intake. Avoid sugary drinks‚ juices‚ and caffeinated beverages‚ as these can hinder hydration and trigger cravings.

Listen to your body’s signals and drink water throughout the day‚ even if you don’t feel thirsty. Proper hydration supports energy levels‚ digestion‚ and overall well-being during this spiritual practice. Remember‚ consistent hydration is key to a successful fast!

Dealing with Cravings

Cravings are a common challenge during the Daniel Fast‚ but utilizing Daniel Fast recipes PDF can help manage them. Recognize that cravings are often temporary and linked to habit or emotional needs. Distract yourself with prayer‚ meditation‚ or gentle exercise when a craving arises.

Focus on the abundance of permitted foods – explore diverse recipes featuring vegetables‚ fruits‚ and whole grains. Ensure you’re consuming enough calories to avoid hunger-induced cravings. Satisfy sweet cravings with naturally sweet fruits like dates or berries‚ incorporated into approved recipes.

Remember the purpose of the fast – spiritual focus – and remind yourself of your commitment. Don’t deprive yourself; instead‚ choose satisfying‚ healthy alternatives from your PDF recipe collection. Support from a community can also provide encouragement during challenging moments.

Breaking the Fast Correctly

Breaking the Daniel Fast requires a gradual reintroduction of foods to avoid digestive upset. Don’t immediately return to your previous diet! Begin with small portions of easily digestible foods‚ like steamed vegetables and whole grains – referencing your Daniel Fast recipes PDF for inspiration.

Introduce fruits first‚ then gradually add legumes and complex carbohydrates. Avoid processed foods‚ refined sugars‚ and unhealthy fats initially. Listen to your body and pay attention to how different foods affect you. Reintroduce meat and dairy slowly‚ observing for any sensitivities.

Continue to prioritize whole‚ plant-based meals even after the fast concludes‚ maintaining the healthy habits cultivated during the 21 days. Use your PDF resource to continue incorporating nourishing recipes into your lifestyle.

fortisase ordering guide

FortiSASE Ordering Guide: A Comprehensive Overview (Updated 02/16/2026)

This guide details Fortinet’s FortiSASE and Zero Trust solutions, covering remote user subscriptions, branch connectivity, and SKU information for ordering purposes.

FortiSASE represents a revolutionary shift in network security, converging networking and security into a single, cloud-delivered service. It’s designed to address the evolving needs of modern, distributed enterprises by providing secure and reliable access to applications and data, regardless of user location.

This integrated platform simplifies IT management, reduces complexity, and enhances security posture. FortiSASE delivers a comprehensive suite of security features, including Secure Web Gateway (SWG), Cloud Access Security Broker (CASB), Firewall-as-a-Service (FWaaS), and SD-WAN capabilities.

Furthermore, FortiSASE Sovereign offers a dedicated solution for organizations requiring data residency and control, enabling the delivery of private SASE services. This ordering guide provides essential details for understanding and procuring FortiSASE solutions, ensuring a smooth deployment and optimal performance.

What is FortiSASE Sovereign?

FortiSASE Sovereign is a specialized, turnkey solution meticulously crafted for organizations demanding utmost control over their data and infrastructure. It empowers customers to deliver private SASE services, catering to both internal and external consumption needs, ensuring data sovereignty and compliance with stringent regulations.

This offering is particularly valuable for large enterprises, federal agencies, and service providers operating in highly regulated industries. It provides a dedicated and isolated environment, allowing complete ownership and management of security policies and data.

FortiSASE Sovereign facilitates the creation of a secure and compliant network perimeter, enabling organizations to confidently embrace cloud adoption and digital transformation while maintaining complete control over their sensitive information. It’s a robust solution for those prioritizing data privacy and regulatory adherence.

Target Audience for FortiSASE

FortiSASE is strategically designed to address the evolving security needs of a diverse range of organizations. Its core value proposition resonates strongly with large enterprises grappling with complex, distributed networks and a growing remote workforce.

Federal agencies, subject to rigorous compliance mandates and heightened security threats, will find FortiSASE’s robust features and control capabilities invaluable. Service providers seeking to offer differentiated, secure access service edge (SASE) solutions to their clients also represent a key target audience.

Essentially, any organization prioritizing secure, cloud-delivered networking and security, with a need for centralized management and consistent policy enforcement, will benefit from FortiSASE. This includes businesses undergoing digital transformation and those seeking to enhance their zero-trust security posture.

FortiSASE Components & Licensing

FortiSASE utilizes a user-based licensing model, offering access to all SASE capabilities with a low Minimum Orderable Quantity of 50 users (MoQ).

FortiSASE Compute Region Add-On

The FortiSASE Region Add-On delivers a one-year subscription for the Comprehensive tier of FortiSASE Compute Region, enhancing performance and localized processing. This add-on is crucial for organizations requiring data residency or low-latency access within specific geographic locations. It allows customers to deploy FortiSASE capabilities closer to their users and branch offices, optimizing the user experience and ensuring compliance with regional regulations.

This subscription provides the necessary compute resources to run FortiSASE services within the chosen region, including Secure Web Gateway, Cloud Firewall, and Zero Trust Network Access. It’s designed to scale with your needs, offering flexibility and control over your SASE infrastructure. Consider this add-on when expanding your FortiSASE deployment or when specific regional requirements dictate localized processing.

User-Based Licensing Model

FortiSASE utilizes a straightforward user-based licensing model, granting access to all SASE capabilities with a remarkably low Minimum Orderable Quantity (MoQ) of just 50 users. This simplifies procurement and aligns costs directly with the number of users accessing the SASE services. Unlike complex, feature-gated licensing schemes, FortiSASE provides comprehensive protection – including Secure Web Gateway, Cloud Firewall, and Zero Trust Network Access – to every licensed user.

This model offers scalability and cost-effectiveness, allowing organizations to easily add or remove users as their needs evolve. It eliminates the need to purchase separate licenses for individual security features, streamlining management and reducing administrative overhead. Explore the Fortinet FortiSASE Ordering Guide for detailed information and to leverage AI chat for instant answers regarding licensing options.

Minimum Orderable Quantity (MoQ)

A key advantage of FortiSASE is its industry-leading Minimum Orderable Quantity (MoQ) of only 50 users. This exceptionally low MoQ makes FortiSASE accessible to organizations of all sizes, from small businesses to large enterprises, without requiring substantial upfront investment. Many competing SASE solutions impose significantly higher MoQ requirements, creating barriers to entry for smaller deployments.

The 50-user MoQ simplifies initial deployment and allows organizations to pilot FortiSASE with a manageable user group before scaling across the entire network. This flexible approach minimizes risk and enables a phased rollout, ensuring a smooth transition to a secure access service edge architecture. Detailed information regarding MoQ and licensing can be found within the comprehensive FortiSASE Ordering Guide.

Ordering Information & SKUs

This section provides comprehensive details on FortiSASE product SKUs, including options for Secure Private Access, Secure Edge Management, and bandwidth add-ons.

FortiSASE Product SKU Details

FortiSASE offers a flexible, user-based licensing model, granting access to all SASE capabilities with a remarkably low Minimum Orderable Quantity (MoQ) of just 50 users. This streamlined approach simplifies procurement and deployment. Customers can augment account bandwidth with the FortiSASE account-level bandwidth add-on, SKU FC1-10-FSASE-471-01-DD, available in 25 Mbps increments.

Furthermore, specialized connectors enhance functionality: the SD-WAN Connector for FortiSASE Secure Private Access and the SASE Connector for FortiSASE Secure Edge Management. The FortiSASE Region Add-On (FC1-10-EMS05-766-02-12) delivers a one-year subscription to the Comprehensive tier of FortiSASE Compute Region, providing localized processing and enhanced performance. Detailed ordering information and a complete product guide are readily available for download, ensuring a clear understanding of available options.

SD-WAN Connector for FortiSASE Secure Private Access

The SD-WAN Connector seamlessly integrates FortiSASE with existing SD-WAN deployments, extending secure access to private applications and resources. This connector is crucial for organizations leveraging SD-WAN infrastructure while desiring enhanced security and Zero Trust Network Access (ZTNA) capabilities. It enables a phased migration to a full SASE architecture, protecting sensitive data without disrupting current network investments.

By combining the strengths of FortiSASE and SD-WAN, businesses gain granular control over application access, reducing the attack surface and improving compliance posture. The connector facilitates secure remote access for users, regardless of location, ensuring consistent security policies are enforced. Detailed SKU information and ordering guidance are available within the comprehensive FortiSASE Ordering Guide, simplifying the procurement process.

SASE Connector for FortiSASE Secure Edge Management

The SASE Connector is a vital component for managing and orchestrating FortiSASE’s security features at the network edge. It provides centralized visibility and control over security policies, enabling administrators to efficiently manage access to cloud applications and resources. This connector streamlines operations, reducing complexity and improving the overall security posture.

Specifically designed for FortiSASE Secure Edge Management, it allows for consistent policy enforcement across all locations and users. The ordering guide details the necessary SKUs for procurement, ensuring a smooth deployment process. Leveraging this connector, organizations can benefit from enhanced threat protection, data loss prevention, and secure web gateway functionalities, all managed through a unified platform. It’s a key element in achieving a robust and scalable SASE architecture.

FortiSASE Account-Level Bandwidth Add-On

For organizations requiring increased throughput, the FortiSASE Account-Level Bandwidth Add-On provides a flexible solution to augment existing capacity. This add-on allows customers to supplement their initial bandwidth allocation, ensuring optimal performance for all users and applications. It’s particularly useful for businesses experiencing growth or seasonal spikes in network traffic.

Available via SKU FC1-10-FSASE-471-01-DD, bandwidth is added in increments of 25 Mbps, offering granular control over resource allocation. This pay-as-you-grow model optimizes cost-effectiveness, avoiding unnecessary upfront investment. The ordering guide clearly outlines the process for purchasing and applying these bandwidth additions to existing FortiSASE accounts. This ensures consistent connectivity and a seamless user experience, even during peak demand, bolstering overall network reliability and productivity.

Deployment & Management

FortiSASE offers flexible deployment options, streamlined user authentication, and robust monitoring capabilities for comprehensive control and visibility of your secure access service edge.

FortiSASE Deployment Options

FortiSASE provides versatile deployment models to suit diverse organizational needs. Customers can leverage a fully cloud-delivered approach, benefiting from scalability and reduced on-premises infrastructure. Alternatively, a hybrid deployment allows integration with existing security investments, offering a phased migration path.

For organizations requiring maximum control and data residency, a dedicated FortiSASE Compute Region Add-On delivers a private, single-tenant SASE service. This option is ideal for large enterprises, federal agencies, and service providers delivering private SASE services. Deployment considerations include network topology, user locations, and security requirements. FortiSASE supports both direct internet access and connectivity through SD-WAN fabrics, ensuring optimal performance and user experience.

User Authentication in FortiSASE

FortiSASE prioritizes secure access through robust user authentication mechanisms. It seamlessly integrates with existing identity providers via industry-standard protocols like SAML, OAuth, and OpenID Connect. This allows organizations to leverage their current investments in identity management systems, simplifying administration and enhancing security.

Multi-factor authentication (MFA) is strongly recommended and supported, adding an extra layer of protection against unauthorized access. FortiSASE also supports certificate-based authentication for enhanced security and compliance. Granular access policies can be defined based on user identity, device posture, and application context, ensuring that only authorized users can access sensitive resources.

FortiSASE Monitoring Capabilities

FortiSASE provides comprehensive monitoring capabilities through FortiManager and FortiAnalyzer, offering real-time visibility into network performance, security threats, and user activity. Administrators can leverage detailed dashboards and reports to gain insights into SASE deployment health and identify potential issues proactively.

Centralized logging and analytics enable efficient troubleshooting and forensic investigations. FortiSASE monitors web traffic, SaaS application usage, and security events, providing valuable data for security analysis and compliance reporting. Customizable alerts notify administrators of critical events, allowing for rapid response to security incidents.

Security Features & Compliance

FortiSASE delivers robust web traffic and SaaS application protection, alongside content inspection features like antivirus, web filtering, and application control.

Web Traffic & SaaS Application Protection

FortiSASE provides comprehensive protection for both web traffic and Software-as-a-Service (SaaS) applications, ensuring a secure digital experience for users. This is achieved through a multi-layered security approach that combines advanced threat intelligence with real-time analysis.

The solution effectively safeguards against a wide range of web-based threats, including malware, phishing attacks, and malicious websites. For SaaS applications, FortiSASE offers granular control and visibility, allowing organizations to enforce security policies and prevent data breaches.

Content inspection, a core component of this protection, utilizes techniques like deep packet inspection and sandboxing to identify and block malicious content before it reaches users. This proactive approach minimizes the risk of compromise and ensures the integrity of sensitive data.

Content Inspection Features (Antivirus, Web Filtering, Application Control)

FortiSASE’s robust content inspection capabilities are central to its security posture, employing a suite of features including advanced antivirus, comprehensive web filtering, and granular application control. Antivirus protection utilizes multiple engines to detect and neutralize malware, safeguarding users from malicious software.

Web filtering allows administrators to categorize and control access to websites, blocking access to risky or inappropriate content. Application control provides visibility into application usage and enables policies to restrict or allow specific applications, minimizing bandwidth consumption and security risks.

Logging capabilities provide detailed records of inspected content, aiding in incident response and compliance reporting. These features work in concert to deliver a layered defense against evolving threats, ensuring a secure and productive user experience.

FortiSASE Security Compliance (AICPA Standards)

FortiSASE is engineered to meet stringent security standards, notably demonstrating compliance with the AICPA (American Institute of Certified Public Accountants) standards. This commitment ensures a high level of security, availability, and confidentiality for customer data and operations.

Compliance encompasses a thorough process, including regular audits and assessments to validate security controls. Available reports detail the scope of the assessment, identified controls, and testing procedures. Key principles underpinning this compliance include robust data protection measures, access controls, and incident response protocols.

This adherence to AICPA standards provides customers with assurance that FortiSASE operates with a strong security foundation, mitigating risks and supporting regulatory requirements.

Operational Technology & Ordering System

The Operational Technology Ordering Guide, alongside the ordering management system, requires security considerations to prevent unauthorized access and potential vulnerabilities.

Operational Technology Ordering Guide

The Operational Technology (OT) Ordering Guide provides crucial details for organizations integrating FortiSASE within operational technology environments. This specialized guide focuses on the unique requirements and considerations when deploying SASE solutions to protect critical infrastructure. It outlines specific SKU recommendations tailored for OT deployments, ensuring compatibility and optimal performance within industrial control systems (ICS) and supervisory control and data acquisition (SCADA) networks.

The guide details how to properly configure FortiSASE to address the distinct security challenges of OT, including protocol inspection, anomaly detection, and secure remote access for OT personnel. It also covers best practices for segmentation, micro-segmentation, and integration with existing OT security tools. Furthermore, the guide emphasizes the importance of adhering to industry-specific compliance standards relevant to operational technology environments, ensuring a robust and secure SASE implementation.

Ordering Management System Security Considerations

Security within the Ordering Management System (OMS) is paramount when procuring and managing FortiSASE licenses and subscriptions. A compromised OMS could allow malicious actors to execute arbitrary code, potentially impacting the entire security posture. Robust security measures are essential to protect sensitive ordering data and prevent unauthorized access or modifications.

Key considerations include implementing strong authentication mechanisms, such as multi-factor authentication (MFA), and enforcing strict role-based access control (RBAC) to limit user privileges. Regular security audits and vulnerability assessments are crucial to identify and remediate potential weaknesses within the OMS. Furthermore, secure coding practices and thorough input validation are necessary to prevent injection attacks. Maintaining up-to-date security patches and monitoring system logs for suspicious activity are also vital components of a comprehensive security strategy for the FortiSASE OMS.

jaap sahib pdf in punjabi

Jaap Sahib PDF in Punjabi: A Comprehensive Guide (Updated 02/16/2026)

Today, February 16th, 2026, accessing the Jaap Sahib PDF in Punjabi is readily available through various online resources, aiding daily spiritual practice and understanding.

Jaap Sahib, a significant composition within the Sri Dasam Granth Sahib, holds immense reverence in Sikhism. The availability of the Jaap Sahib PDF in Punjabi ensures wider accessibility to this powerful hymn. This digital format preserves the original Gurmukhi script, alongside valuable translations and pronunciation guides.

It serves as a cornerstone for daily Nitnem (obligatory prayers) and fosters profound spiritual growth. The PDF format allows devotees to easily engage with the text, regardless of location. Resources like DiscoverSikhism.com and various Gurdwaras offer these PDFs, promoting understanding and correct recitation. The preservation of this sacred text in a readily available digital format is crucial for future generations.

What is Jaap Sahib?

Jaap Sahib is a lengthy hymn composed by Guru Gobind Singh Ji, the tenth Sikh Guru. The Jaap Sahib PDF in Punjabi presents this composition in its original script, allowing for authentic study. It consists of 199 verses, meticulously structured into Savaiye and Chaupai forms, creating a rhythmic and devotional experience.

The hymn is a powerful declaration of God’s attributes and a celebration of divine glory. Accessing the PDF facilitates understanding through translations and Steeks (detailed explanations) by scholars like Prof. Sahib Singh and Dr. Gurcharan Singh Mehta. This digital resource ensures the preservation and dissemination of this vital spiritual text within the Sikh community.

The Significance of Jaap Sahib in Sikhism

Jaap Sahib holds immense importance in Sikhism, representing a profound expression of devotion and a cornerstone of daily spiritual practice – Nitnem. The readily available Jaap Sahib PDF in Punjabi allows Sikhs worldwide to connect with this sacred text. It’s recited to invoke divine blessings and cultivate a deeper relationship with Waheguru.

Within Sikh culture, Jaap Sahib embodies courage, strength, and spiritual growth. Studying the PDF, alongside translations and Steeks, fosters a comprehensive understanding of its teachings. Correct recitation, guided by pronunciation aids within the PDF, is highly valued, contributing to personal and communal spiritual elevation.

Understanding the Text & Resources

Jaap Sahib PDFs in Punjabi are widely accessible via websites, Gurdwaras, and Sikh organizations, offering convenient access to this vital spiritual text.

Availability of Jaap Sahib PDF in Punjabi

Numerous digital resources provide the Jaap Sahib in Punjabi PDF format, catering to a global Sikh community. These PDFs preserve the original Gurmukhi script, alongside translations and pronunciation guides, facilitating both learning and daily Nitnem practice.

Several Sikh religious websites and cultural platforms host these PDFs for free download. Many Gurdwaras and Sikh organizations also offer convenient access, sometimes directly on their websites or through dedicated apps. Resources like DiscoverSikhism.com provide downloadable PDFs, alongside scholarly steeks (commentaries) by Prof. Sahib Singh.

Furthermore, platforms dedicated to Sikh literature, such as those offering Sri Dasam Granth Sahib Ji steeks, also feature the Jaap Sahib PDF. This widespread availability ensures that this sacred text is accessible to anyone with an internet connection.

Key Websites for Downloading Jaap Sahib PDF

DiscoverSikhism.com stands out as a primary source, offering a Jaap Sahib PDF alongside Prof. Sahib Singh’s detailed steek, enhancing understanding. Various online repositories also host multiple versions, including those with differing formatting and translations.

While specific URLs can change, searching for “Jaap Sahib PDF” on major search engines consistently yields results from Sikh-focused websites. Platforms dedicated to Gurbani literature frequently provide downloadable PDFs. Additionally, some Gurdwaras maintain websites with downloadable resources for their congregations.

Users should exercise caution and verify the source when downloading PDFs, ensuring authenticity and accuracy. Checking for established Sikh organizations’ logos or affiliations can help confirm reliability.

Gurdwaras and Sikh Organizations Offering Access

Many Gurdwaras globally provide access to the Jaap Sahib in Punjabi, often through physical copies or digital resources on their websites. These institutions frequently host Nitnem programs where the text is recited, and copies are readily available for attendees.

Sikh organizations dedicated to promoting religious education, like those focused on Gurbani studies, often distribute Jaap Sahib PDFs as part of their learning materials. These organizations prioritize accurate transcriptions and translations.

Contacting local Gurdwaras directly is a reliable way to obtain a copy or inquire about digital access. Furthermore, larger Sikh centers may offer online libraries with downloadable texts, fostering wider accessibility to this sacred hymn.

Content and Structure of Jaap Sahib

Jaap Sahib comprises 199 verses, beautifully structured with Savaiye and Chaupai forms, rhythmically praising God’s attributes within the sacred Punjabi PDF.

Total Number of Verses in Jaap Sahib

Jaap Sahib, a central composition within the Dasam Granth, is meticulously composed of a total of 199 verses. These verses are not simply a collection of words, but a carefully constructed spiritual journey encapsulated within the Punjabi PDF format. The number 199 holds significance, representing a complete and comprehensive praise of the Divine.

Each verse contributes to the overall narrative, building upon the previous one to create a powerful and immersive experience for the reader and practitioner. Accessing the Jaap Sahib PDF allows for a detailed study of each individual verse, fostering a deeper connection with the Gurbani. The structured arrangement of these verses is key to understanding the profound message embedded within this sacred text, readily available in digital Punjabi format.

Structure: Savaiye and Chaupai

The Jaap Sahib’s structure, beautifully preserved in the Punjabi PDF versions, is uniquely defined by the interwoven forms of Savaiye and Chaupai. Savaiye are poetic stanzas consisting of seven lines, while Chaupai are quatrains – four-line verses. This alternating pattern creates a rhythmic flow, enhancing the devotional experience when reciting from the digital text.

The PDF format allows for easy visual identification of these distinct structures. The Savaiye often introduce profound philosophical concepts, while the Chaupai elaborate on them, praising God’s attributes. This deliberate arrangement isn’t merely aesthetic; it’s integral to the text’s meaning, making the Punjabi Jaap Sahib PDF a valuable tool for study and contemplation;

The Rhythmic Hymn and Praising God’s Attributes

The Jaap Sahib, accessible in Punjabi PDF format, is fundamentally a rhythmic hymn dedicated to extolling the virtues and attributes of the Divine. The text, when read from the PDF, reveals a powerful cadence, designed to elevate the spirit and foster deep connection with Waheguru.

Each verse meticulously details God’s power, glory, and benevolence. The Punjabi PDF versions faithfully retain the original Gurmukhi script, allowing readers to appreciate the poetic artistry and the inherent musicality of the composition. Reciting from the PDF, one experiences a profound sense of reverence and awe, understanding the boundless qualities of the Creator.

Translations and Interpretations

Jaap Sahib PDFs in Punjabi often include translations in both Punjabi and English, unlocking deeper spiritual understanding for a wider audience.

Jaap Sahib Translations in Punjabi

Numerous Jaap Sahib PDFs readily available online feature comprehensive translations directly into Punjabi, catering to a broad spectrum of Sikh practitioners and learners. These translations aim to elucidate the profound meanings embedded within the original Gurmukhi verses, making the text more accessible to those whose first language is Punjabi.

The quality and style of these Punjabi translations can vary, with some prioritizing literal accuracy while others focus on conveying the poetic and spiritual essence of the hymn. Many PDFs incorporate both, offering a nuanced understanding of Jaap Sahib’s rich linguistic and theological layers. Accessing these resources is crucial for individuals seeking a deeper connection with this sacred text within their native language.

Jaap Sahib Translations in English

Alongside Punjabi versions, a wealth of Jaap Sahib PDFs include detailed English translations, broadening accessibility for a global audience. These translations strive to convey the complex philosophical and spiritual concepts present in the original Gurmukhi text, allowing English-speaking individuals to engage with the hymn’s profound message.

Like Punjabi translations, English versions differ in their approach, ranging from literal interpretations to more interpretive renderings that emphasize the poetic beauty and devotional intent. Many PDFs offer accompanying transliterations and explanations, enhancing comprehension. These resources are invaluable for those seeking to understand Jaap Sahib’s significance within the broader context of Sikh theology and practice.

Importance of Translations for Deeper Understanding

Translations, both in Punjabi and English within Jaap Sahib PDFs, are crucial for unlocking the hymn’s multifaceted layers of meaning. The original Gurmukhi, while beautiful, can present linguistic challenges for many. Translations bridge this gap, revealing the depth of spiritual wisdom embedded within each verse.

Understanding the historical and cultural context, often provided alongside translations, further enriches the experience. These resources illuminate the symbolism and allusions present in the text, fostering a more profound connection with the divine message. Accessing translated PDFs empowers individuals to move beyond rote recitation towards genuine comprehension and internalization of Jaap Sahib’s teachings.

Detailed Explanations & Steeks

Jaap Sahib PDFs often include Steeks by scholars like Prof. Sahib Singh and Dr. Gurcharan Singh Mehta, offering verse-by-verse explanations for deeper insight.

Jaap Sahib Steek by Prof. Sahib Singh

Professor Sahib Singh’s Steek (commentary) on Jaap Sahib is a highly respected and widely used resource for understanding the profound meanings within this sacred text. Available within many Jaap Sahib PDF versions in Punjabi, his work provides detailed explanations of each verse, unraveling the complex philosophical and spiritual concepts presented.

This Steek doesn’t merely translate the words; it delves into the historical context, the nuances of the Gurmukhi language, and the underlying Sikh theology. Readers benefit from his insightful interpretations, gaining a richer appreciation for the hymn’s praise of God’s attributes and the warrior spirit it embodies. The PDF format allows for easy access and study, making Prof. Sahib Singh’s commentary invaluable for both beginners and advanced students of Gurbani.

Sri Dasam Granth Sahib Ji Steek (Jaap Sahib Volume 1)

Dedicated specifically to Jaap Sahib, Volume 1 of the Sri Dasam Granth Sahib Ji Steek offers a comprehensive analysis of this essential composition. Found within numerous Jaap Sahib PDF resources in Punjabi, this commentary provides a detailed verse-by-verse explanation, rooted in Sikh tradition and scholarship.

This Steek illuminates the historical and theological context of Jaap Sahib, clarifying its significance within the broader framework of the Dasam Granth. It assists readers in grasping the deeper meanings embedded in the poetic language and rhythmic structure. Accessing this Steek through PDF formats enhances study, offering a valuable tool for understanding the spiritual depth and cultural importance of Jaap Sahib.

Jaap Sahib ─ Vyakhya Atey Vichar Darshan by Dr. Gurcharan Singh Mehta

Dr. Gurcharan Singh Mehta’s “Jaap Sahib ─ Vyakhya Atey Vichar Darshan” presents a profound exploration of the text, readily available in PDF format alongside other Jaap Sahib resources in Punjabi. This work delves into the philosophical underpinnings and intricate meanings of each verse, offering a scholarly perspective on its spiritual significance.

Mehta’s commentary provides a nuanced understanding of the historical context and linguistic nuances of Jaap Sahib. It’s a valuable resource for those seeking a deeper intellectual and spiritual engagement with the composition. Finding this Vyakhya in PDF form facilitates accessible study, enriching comprehension and fostering a more profound connection to the Gurbani.

Pronunciation and Nitnem

Punjabi Jaap Sahib PDFs often include pronunciation guides, crucial for correct recitation during daily Nitnem, enhancing spiritual practice and understanding.

Pronunciation Guides within the PDF

Many Jaap Sahib PDFs in Punjabi are thoughtfully designed to assist learners with accurate pronunciation. These guides often incorporate transliteration, presenting the Gurmukhi text alongside phonetic representations in Roman script. This feature proves invaluable for individuals unfamiliar with the Gurmukhi alphabet, enabling them to navigate the verses with greater confidence.

Furthermore, some PDFs include audio recitations, allowing users to listen to the correct pronunciation of each word and phrase. This auditory component significantly enhances the learning experience, particularly for those seeking to incorporate Jaap Sahib into their daily Nitnem practice. The inclusion of pronunciation aids demonstrates a commitment to accessibility, ensuring that individuals from diverse backgrounds can engage with this sacred text effectively and respectfully.

Jaap Sahib as Part of Daily Nitnem

The Jaap Sahib holds a central position within the daily Nitnem, the prescribed set of prayers for Sikhs. Reciting Jaap Sahib is traditionally performed in the early morning, often before sunrise, as a means of connecting with Waheguru and setting a spiritual tone for the day. Accessing the Jaap Sahib PDF in Punjabi facilitates this practice, providing a convenient and readily available resource for devotees.

Consistent recitation is believed to foster inner peace, strengthen faith, and cultivate a deeper understanding of Sikh principles. The PDF format allows individuals to easily follow along, whether reciting independently or as part of a congregation. It’s a cornerstone of spiritual discipline, promoting mindfulness and devotion.

Importance of Correct Recitation

Maintaining accurate pronunciation during Jaap Sahib recitation is highly valued within Sikh tradition. Utilizing a Jaap Sahib PDF in Punjabi, particularly those including pronunciation guides, assists in achieving correct articulation of the Gurmukhi script. Proper recitation isn’t merely about vocalizing the words, but about understanding and respecting their spiritual weight.

Mispronunciation can inadvertently alter the meaning and diminish the devotional impact. The PDF resources often offer phonetic breakdowns, aiding learners in mastering the sounds. Correct recitation is considered a form of selfless service (seva), honoring the Guru’s teachings and fostering a deeper connection with the divine.

Cultural and Religious Significance

The Jaap Sahib PDF in Punjabi deeply resonates within Sikh culture, fostering spiritual growth and connecting individuals to their rich historical and religious roots.

Jaap Sahib’s Role in Sikh Culture

The Jaap Sahib, accessible through Punjabi PDFs, holds a central position in Sikh cultural identity. It’s not merely a text but a living tradition, woven into the fabric of daily life and significant ceremonies. The PDF format facilitates wider access, allowing Sikhs globally to connect with this powerful hymn.

Its recitation is deeply ingrained in Nitnem, the daily devotional practices, strengthening faith and fostering a sense of community. The availability of the text in its original Gurmukhi script, via PDF, ensures the preservation of linguistic and cultural heritage. Furthermore, the Jaap Sahib’s themes of courage, devotion, and divine attributes inspire Sikhs to embody these qualities in their actions and interactions, reinforcing core Sikh values.

Spiritual Growth through Jaap Sahib

Engaging with the Jaap Sahib, particularly through readily available Punjabi PDFs, is considered a potent pathway to spiritual elevation within Sikhism. Consistent recitation, aided by accessible digital formats, cultivates a deeper connection with the Divine. The text’s powerful verses inspire contemplation on God’s attributes, fostering humility and gratitude.

The PDF’s inclusion of translations and steeks (commentaries) further enhances understanding, allowing for a more profound meditative experience. Sikhs believe that regular practice of Jaap Sahib purifies the mind, strengthens the spirit, and ultimately leads to self-realization. It’s a tool for inner transformation, promoting peace, courage, and unwavering faith.

Understanding the Historical Context

The Jaap Sahib originates from the Dasam Granth Sahib, penned by Guru Gobind Singh Ji, the tenth Sikh Guru. Understanding this historical foundation is crucial when studying the Punjabi PDF versions available today. Guru Gobind Singh composed it during a period of intense political and religious upheaval, facing persecution and conflict.

The hymn reflects the Guru’s warrior spirit and unwavering devotion to God. Accessing the text via PDF allows for convenient study of its origins and the context in which it was created. Recognizing the historical challenges faced by the Guru deepens appreciation for the Jaap Sahib’s message of strength, resilience, and faith.

Additional Resources

Explore resources like the Sri Guru Granth Sahib Ji Dictionary and Gurbani Path Darpan Punjabi alongside the Jaap Sahib PDF for enriched study.

Sri Guru Granth Sahib Ji Dictionary (Punjabi)

Utilizing the Sri Guru Granth Sahib Ji Dictionary (Punjabi) is invaluable when studying the Jaap Sahib PDF. This comprehensive dictionary, spanning 4025 pages, provides detailed definitions of Gurbani terms, crucial for accurate interpretation of the Jaap Sahib’s verses.

Understanding the nuances of the Punjabi language, as used in the sacred texts, unlocks deeper layers of meaning within the Jaap Sahib. The dictionary assists in deciphering archaic words and phrases, ensuring a more profound connection with the spiritual message. It’s a vital tool for anyone seeking a thorough understanding of the Jaap Sahib PDF in its original linguistic context, enhancing both recitation and contemplation.

Gurbani Path Darpan Punjabi

The Gurbani Path Darpan Punjabi serves as an excellent companion when engaging with the Jaap Sahib PDF. Available for free download as a PDF or text file, this resource offers valuable insights into the correct pronunciation and understanding of Gurbani.

It aids in navigating the complexities of the Punjabi script and grammatical structures present in the Jaap Sahib. By clarifying the meaning of words and phrases, the Darpan enhances comprehension of the hymn’s spiritual message. This resource is particularly helpful for those learning to recite the Jaap Sahib from the PDF, ensuring accurate and respectful delivery of this sacred text.

DiscoverSikhism.com Resources on Jaap Sahib

DiscoverSikhism.com provides a wealth of resources related to the Jaap Sahib, complementing the study of the Jaap Sahib PDF in Punjabi. Notably, they offer Jaap Sahib Steek by Prof. Sahib Singh, available for non-commercial use under an Attribution-NonCommercial-NoDerivs 4.0 International license.

This Steek, a detailed commentary, illuminates the meaning and significance of each verse, deepening understanding for those studying the text. The website’s resources, totaling 272.5MB, are invaluable for learners. They facilitate a more profound connection with the Jaap Sahib’s spiritual essence, enhancing the experience of reading the PDF version in its original Punjabi script.

carrier edge thermostat installation manual

Carrier Edge Thermostat Installation: A Comprehensive Guide

This guide details the installation of Carrier Edge Pro thermostats, like the 33CS2PP2S-03, covering wiring, mounting, and configuration for optimal HVAC control․

It provides a comprehensive overview, referencing features like two-stage heating/cooling, auxiliary heat control, and compatibility with various systems․

Proper installation ensures efficient operation, security features like lockout, and reliable memory retention even during power outages, as detailed in the manual․

Understanding the Edge Pro Thermostat

The Carrier Edge Pro thermostat, specifically models like the 33CS2PP2S-03, represents a significant advancement in commercial and residential HVAC control․ This non-communicating, programmable thermostat is designed for versatility, supporting two-stage heating and cooling alongside auxiliary heat capabilities․

Its compatibility extends to air conditioning, heat pump, and water source heat pump systems, offering a broad range of applications․ The Edge Pro distinguishes itself with features like humidity control and hybrid heat compatibility, enhancing comfort and efficiency․

Crucially, the thermostat prioritizes security with compressor lockout and keypad lockout features, protected by passcode access․ Installation is streamlined, and the device operates without batteries, relying on internal memory to retain settings indefinitely, even during prolonged power loss, maintaining time for at least 24 hours․

Key Features of the Edge Pro 33CS2PP2S-03

The Carrier Edge Pro 33CS2PP2S-03 boasts a robust feature set designed for comprehensive climate control․ It supports two-stage heating and two-stage cooling, optimizing energy usage and comfort levels․ Auxiliary heat functionality ensures reliable warmth during colder periods․

Humidity control capabilities allow for precise moisture management, enhancing indoor air quality․ Hybrid heat compatibility broadens its application to diverse HVAC setups․ Security is paramount, with compressor lockout preventing damage and keypad lockout safeguarding settings via passcode protection․

Notably, this thermostat operates without batteries, utilizing internal memory for unlimited retention of user configurations, even during power outages․ The clock maintains accuracy for at least 24 hours without external power, ensuring consistent operation․

Thermostat Compatibility: HVAC Systems

The Carrier Edge Pro thermostat demonstrates broad compatibility across various HVAC systems, offering versatile climate control solutions․ It seamlessly integrates with standard air conditioning systems, providing efficient cooling management․ Furthermore, it supports heat pump operation, adapting to both heating and cooling demands effectively․

Water source heat pump systems are also fully supported, extending its applicability to diverse building infrastructures․ The thermostat’s two-stage heating and cooling capabilities optimize performance within these systems․

Its design accommodates auxiliary heat control, ensuring reliable warmth during extreme temperatures․ This compatibility ensures a smooth transition and efficient operation within existing HVAC setups, maximizing comfort and energy savings․

Supported Systems: Air Conditioning, Heat Pump, Water Source Heat Pump

The Carrier Edge Pro thermostat is engineered for seamless integration with a wide array of heating and cooling systems․ Specifically, it provides robust support for conventional air conditioning units, delivering precise temperature regulation and enhanced comfort․

Heat pump systems, both air-to-air and geothermal, are fully compatible, allowing for efficient heating and cooling cycles throughout the year․ Water source heat pump applications are also directly supported, broadening its versatility for commercial and residential settings․

This broad compatibility ensures optimal performance and energy efficiency across diverse HVAC configurations, making the Edge Pro a reliable choice for various climate control needs․

Two-Stage Heating and Cooling Operation

The Carrier Edge Pro thermostat excels in systems utilizing two-stage heating and cooling capabilities․ This advanced functionality allows for more refined temperature control and improved energy efficiency compared to single-stage systems․

During moderate conditions, the thermostat operates at a lower, more economical stage, reducing energy consumption and providing consistent comfort․ When extreme temperatures demand it, the thermostat automatically switches to the higher stage for maximum heating or cooling output․

This intelligent operation optimizes performance, minimizing energy waste and ensuring a consistently comfortable indoor environment․ The Edge Pro’s two-stage control enhances both comfort and cost savings․

Auxiliary Heat Control

The Carrier Edge Pro thermostat provides robust control over auxiliary heating systems, crucial for maintaining comfort during severely cold weather․ This feature is particularly important for heat pump installations, where auxiliary heat supplements the primary heat pump when temperatures drop significantly․

The thermostat intelligently manages the auxiliary heat, activating it only when necessary to prevent energy waste․ It ensures a seamless transition between heat pump and auxiliary heat, providing consistent warmth without temperature fluctuations․

Proper configuration of auxiliary heat settings is essential for optimal performance and efficiency․ The Edge Pro offers customizable settings to tailor auxiliary heat operation to specific climate conditions and homeowner preferences․

Pre-Installation Considerations

Before beginning the Carrier Edge thermostat installation, several crucial steps must be taken to ensure a safe and successful process; Prioritize safety by completely disconnecting power to the HVAC system at the breaker panel – this is non-negotiable․ Gather the necessary tools, including screwdrivers, wire strippers, and a level, to streamline the installation․

Carefully identify the existing wiring connected to the old thermostat․ Document the wire colors and their corresponding terminals – a photograph is highly recommended․ Understanding the current wiring configuration is vital for accurate connection to the Edge Pro․

Review the thermostat’s compatibility with your specific HVAC system to avoid potential issues․

Safety Precautions & Power Disconnection

Prior to any installation work, absolute adherence to safety precautions is paramount․ Always disconnect power to the HVAC system at the breaker box before handling any wiring․ Confirm power is off using a non-contact voltage tester to prevent electrical shock․ Never work with live wires – this poses a serious safety hazard․

Exercise caution when handling tools and avoid damaging existing wiring․ If unsure about any step, consult a qualified HVAC technician․ Proper grounding is essential for safe operation․ Follow all local electrical codes and regulations․

Remember, safety is non-negotiable when working with electrical systems․

Tools Required for Installation

Successful Carrier Edge thermostat installation necessitates a specific toolkit․ A Phillips head screwdriver is crucial for mounting the thermostat and accessing wiring connections․ A flathead screwdriver may be needed for certain terminal screws․ Wire strippers are essential for preparing wires for secure connections․ A non-contact voltage tester confirms power is safely disconnected․

Pliers assist with wire manipulation, while a level ensures proper thermostat alignment․ Electrical tape provides insulation for exposed wires․ A drill (with appropriate bits) may be required for mounting, depending on the wall surface․ Labels help document existing wiring for easy reconnection․

Identifying Existing Wiring

Before disconnecting the old thermostat, meticulously document the existing wiring․ Carefully label each wire connected to the terminals, noting their color and corresponding function․ Common terminals include R (power), C (common), Y (cooling), G (fan), W (heating), and potentially auxiliary heat wires․

Take clear photographs of the wiring configuration as a visual reference․ Pay close attention to any jumper wires or unique connections․ Understanding the existing setup is vital for accurate reconnection to the Carrier Edge thermostat․ Incorrect wiring can lead to system malfunction or damage․

Installation Process: Wiring the Thermostat

With power disconnected, carefully connect the wires to the corresponding terminals on the Carrier Edge thermostat base․ Refer to the wiring diagram included with the thermostat and the documentation of your existing system․ Ensure each wire is securely fastened to its terminal․

The Y2 wire can utilize PEK for simplified installation, potentially avoiding the need for new wiring․ Proper interpretation of the wiring diagram is crucial, especially when dealing with humidifier connections and isolation relays for powered humidifiers․ Double-check all connections before proceeding to mounting․

Connecting the Y2 Wire (PEK Utilization)

The Carrier Edge thermostat allows for utilizing the existing Y2 wire, often in conjunction with a PEK (Port Extension Kit), streamlining the installation process and potentially eliminating the need to run new wiring․ This is particularly useful when upgrading from a system without a dedicated Y2 wire․

Carefully connect the Y2 wire to the designated terminal on the thermostat base․ Note that illustrations may not always be fully accurate, so always cross-reference with the specific wiring diagram for your model․ Proper PEK utilization ensures correct operation of two-stage cooling systems․

Wiring Diagram Interpretation

Accurate interpretation of the wiring diagram is crucial for a successful Carrier Edge thermostat installation․ The diagram details the specific terminal connections for various HVAC system configurations, including air conditioning, heat pumps, and water source heat pumps․

Pay close attention to the wire designations (Y, G, W, R, C, etc․) and their corresponding terminals․ Ensure correct connections for auxiliary heat, humidifier, and other optional components․ Incorrect wiring can lead to system malfunction or damage․ Refer to the manual’s diagram and double-check all connections before powering on the system․

Humidifier Connection & Isolation Relays

The Carrier Edge thermostat supports connection to 24VAC operated humidifiers directly through its humidify output terminal․ However, when utilizing powered humidifiers, an isolation relay is often required to prevent voltage conflicts and ensure proper operation․

This relay acts as a switch, isolating the humidifier’s power source from the thermostat’s control circuit․ No additional interlocks or connections are typically needed beyond the relay installation․ Consult the humidifier’s documentation and the thermostat manual for specific wiring instructions and relay specifications to guarantee a safe and functional setup․

Thermostat Mounting & Physical Installation

Proper thermostat placement is crucial for accurate temperature sensing and optimal system performance․ Select a location away from direct sunlight, drafts, and heat-generating appliances․ Consider internal walls for more stable readings․

Installation can be achieved using a single-piece mounting method, which requires more wiring but offers a streamlined appearance․ Ensure the mounting plate is securely fastened to the wall before connecting the wiring․ The Edge thermostat doesn’t require batteries, relying on consistent power for memory retention․ Carefully align and attach the thermostat body to the base plate after wiring is complete․

Selecting an Optimal Thermostat Location

Choosing the right location significantly impacts the accuracy and efficiency of your Carrier Edge thermostat․ Avoid areas exposed to direct sunlight, as this can artificially inflate temperature readings․ Similarly, steer clear of drafts from doors, windows, or vents, which can provide inaccurate measurements․

Internal walls generally offer more stable temperatures than exterior walls․ Keep the thermostat away from heat-generating appliances like lamps or televisions․ A central location on a frequently used floor is ideal for representative temperature control․ Ensure easy access for programming and adjustments, while maintaining a secure mounting position․

Single-Piece vs․ Other Installation Methods

The Carrier Edge thermostat offers a single-piece installation option, differing from systems utilizing remote sensors or separate control panels․ While single-piece installations require more extensive wiring directly to the HVAC system, they eliminate the need for additional components and potential communication issues․

This method typically results in a higher profile on the wall, as all components are housed within the thermostat unit itself․ Alternative methods, if compatible, might offer a sleeker aesthetic but could introduce complexity․ Carefully consider wiring accessibility and desired appearance when choosing your installation approach, referencing the provided diagrams․

Post-Installation Configuration & Testing

Following physical installation, proper configuration is crucial for optimal performance of your Carrier Edge thermostat․ Begin by accurately setting the current clock and date, ensuring correct timekeeping for scheduling functions․ Next, program your desired heating and cooling schedules to maximize comfort and energy efficiency․

Explore security features like compressor lockout, preventing rapid cycling, and keypad lockout, safeguarding settings with a personalized passcode․ Thoroughly test all functions – heating, cooling, auxiliary heat, and humidity control – to verify correct operation․ Refer to the manual for detailed instructions on navigating the thermostat’s interface and customizing settings․

Setting the Clock and Date

Accurate time and date settings are fundamental for the Carrier Edge thermostat’s scheduling and operational functions․ Access the clock setting menu through the thermostat’s interface, typically found within the ‘Settings’ or ‘System’ options․ Use the navigation buttons to adjust the hour and minute, ensuring AM/PM is correctly selected․

Similarly, navigate to the date setting menu and input the current month, day, and year․ The Edge thermostat’s internal memory retains these settings even during brief power outages, maintaining schedule accuracy․ Confirm your entries and exit the menu; the display should reflect the updated time and date․

Programming Heating and Cooling Schedules

The Carrier Edge thermostat allows customized heating and cooling schedules to optimize comfort and energy savings․ Access the programming mode through the thermostat’s menu, often labeled ‘Schedule’ or ‘Program’․ You can typically define different settings for weekdays and weekends, or create unique schedules for each day․

For each period (e․g․, Wake, Leave, Return, Sleep), set the desired temperature for both heating and cooling․ The thermostat will automatically adjust the temperature based on your programmed schedule․ Review and save your settings to activate the programmed schedule, ensuring optimal climate control and energy efficiency․

Compressor Lockout and Keypad Lockout Setup

The Carrier Edge thermostat offers compressor lockout, protecting the HVAC system from short-cycling and potential damage․ This feature, accessible through the settings menu, delays compressor restarts for a defined period, typically five minutes, extending its lifespan․

Keypad lockout secures the thermostat settings, preventing unauthorized changes․ Activate this feature by entering the settings menu and enabling the keypad lock, requiring a passcode for adjustments․ This is particularly useful in commercial settings or homes with children․ Remember to securely store your passcode for future access and adjustments to these important security features․

Troubleshooting Common Issues

If the thermostat experiences power loss, the Edge Pro’s internal memory retains settings for an unlimited time, and the clock runs for at least 24 hours․ However, verify proper wiring connections if the display remains blank after power restoration․

Addressing wiring errors is crucial; double-check the wiring diagram for accurate connections․ Incorrect wiring can cause system malfunctions or damage․ If issues persist, consult a qualified HVAC technician․ Ensure all connections are secure and that the correct wire colors correspond to the designated terminals․ A systematic review of the wiring is often the quickest path to resolution․

Power Loss & Memory Retention

The Edge thermostat distinguishes itself by eliminating the need for batteries to preserve user settings․ Unlike many models, it relies on internal memory, ensuring configurations are retained indefinitely during power outages․

Notably, the clock continues to operate for a minimum of 24 hours even without external power․ This feature minimizes the need for frequent time resets․ While the thermostat doesn’t require battery backups, a prolonged power loss will eventually necessitate resetting the time and date․ This robust memory retention is a key advantage of the Carrier Edge system․

Addressing Wiring Errors

Incorrect wiring is a common issue during thermostat installation․ Carefully review the wiring diagram before connecting any wires, ensuring each connection corresponds to the correct terminal․ Double-check the Y2 wire connection, particularly when utilizing PEK for compatibility with existing systems․

If the system doesn’t operate as expected, immediately disconnect power and re-examine all wiring connections․ Misplaced wires can cause system malfunctions or damage․ Consult the installation manual for specific troubleshooting steps related to wiring errors․ Ensure proper isolation relays are used when connecting to powered humidifiers․